This article explains how to manage candidates efficiently covering sourcing, screening, interviewing, and engagement to identify top talent while ensuring a smooth and positive hiring experience.
Make sure to complete all the steps below to manage candidates efficiently.
Here's an elaboration on the purpose of each setup step:
- Step 1. Create Candidate via Form: Use a predefined template to manually enter candidate details in a structured format, ensuring consistency and completeness of information.
- Step 2. Create Candidate via Application Form: A standard form used by applicants to share personal, educational, and professional details when applying for a job.
- Step 3. Create Candidate via SmartEmail Parsing: Xeople SmartEmail automatically parses resumes received via email to capture candidate details and add them to the system.
- Step 4. Create Candidate – Entire OnHire Push or Extract: Push or extract candidate data between Entire OnHire and XeopleRecruit, including details like skills, notes, and emergency contacts.
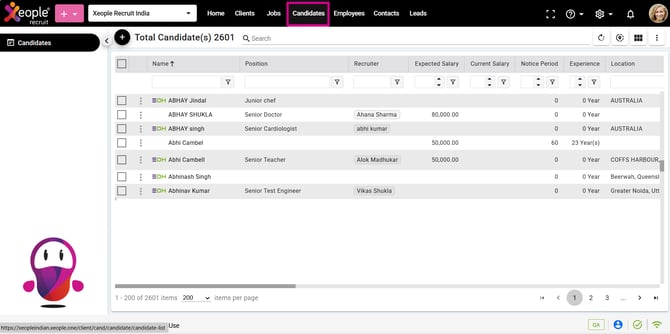
- Step 5. Candidate Landing: View and manage candidates sourced from all channels in one central list, including key details such as name, contact, source, and status.
- Step 6. Push Candidate as an Applicant (Landing & Summary): Easily push candidates from XeopleRecruit to Entire OnHire as applicants, enabling smooth job mapping and applicant management.
- Step 7. Push Candidate as a Member (Landing & Summary): Convert candidates into members in Entire OnHire for shift allocation and payroll. Members receive login credentials to view and manage shifts.
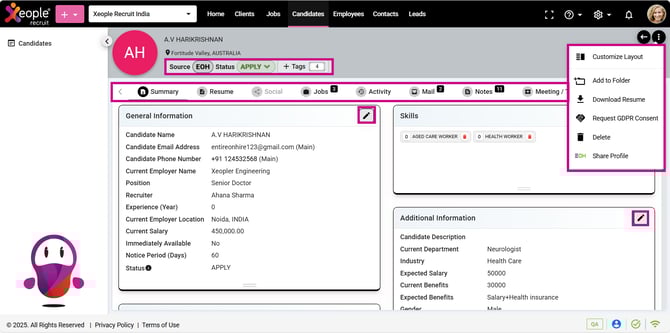
- Step 8. Profile Details: View all personal and professional details of a candidate, including contact info, experience, education, and certifications.
- Step 9. Education Details: Capture educational history such as degrees, institutions, fields of study, and certifications.
- Step 10. Employment History: Maintain records of previous employment, including roles, duration, and key achievements.
- Step 11. Organise Folders: Group candidates into specific folders directly from the Candidate Landing page for easy access and management.
- Step 12. Search Job: Quickly map candidates to jobs by title directly from the Candidate Summary page.
- Step 13. Candidate Activities: Track all interactions and updates related to a candidate throughout the recruitment process in one view.
- Step 14. Candidate Emails: View and send all candidate-related communication, including interview invites and updates, directly from the system.
- Step 15. Notes: Record and share key observations or updates about candidates for easy collaboration and decision-making.
- Step 16. Documents: Store and manage all candidate-related documents — such as resumes, cover letters, and certificates — in one organised space.
- Step 17. Call Page - Candidate Summary: Provides easy access to call logs, showing the total number of calls for specific candidate and offering the option to log manual calls for accurate tracking.
- Step 18. Contact Candidates: Communicate directly with candidates via email or SMS to share updates, schedule interviews, and exchange key information seamlessly.
- Step 19. Share Job with Candidates: Send job links or application pages directly to potential candidates through email, enabling quick engagement and easy application access.
- Step 20. Set Status for Candidates from Various Sources: Assign status, tags, and folders to candidates sourced from Forms, Application Forms, Entire OnHire, SmartEmail, and more — all in one place for better organisation and control.