
The Lead Summary page acts as a centralised hub for managing and accessing detailed lead information. From here, you can update information, track progress, and take specific actions such as sending emails or SMS, adding notes, or meeting, etc. The Lead Summary Page streamlines lead management, ensuring all critical details are available at a glance.
Clicking on a lead's name in the lead listing page opens its profile in a new tab, directing you to the Lead Summary Page.
You can benefit from the Lead Summary page in several ways:
- Access all lead information in one place, eliminating the need for multiple searches.
- Communicate efficiently with leads using available contact details and interaction history.
- Organise lead details systematically for easier tracking and management.
- Make informed decisions and optimise strategies with comprehensive lead profiles and insights.
To navigate to the Lead Summary page, follow these steps:
- Navigate to the main navigation header bar and click on Leads.
- Select a Lead Workflow.
- Access the list of all leads, then click on any lead to be directed to the Lead Summary page.
Lead Listing Page – Lead – Lead Summary
Here's an elaboration on the features typically included on the Lead summary page:
- Status: The lead status indicates the current stage, providing valuable insights into the lead's lifecycle.
Note: The Status field is disabled, making it non-editable through the drop-down or any other edit options.
- Tag: Tags are customisable labels that you can assign to leads to categorise them based on specific criteria or characteristics. You have the option to activate or deactivate tags directly from the lead summary page.
- Summary: The Summary tab comprises vital sections including Lead Details, Organisation Structure, Location/Address Details, Lead Description, and more, allowing for easy editing and addition of information.
Information: In the Summary tab, the Parent Lead field will remain restricted while the record is still a lead, preventing the creation of an organisational structure. Once the lead is converted into a client, the option to add a Parent Client will become available.
Information: When changing a lead's workflow from here and clicking the back button, the lead will be redirected to the first stage of the newly mapped workflow.
- Location: You can add various types of locations related to the lead, including, workplace addresses, and other relevant locations.
- Contacts: You can add and manage individual contacts associated with the lead, including key decision-makers, stakeholders, and representatives.
- Assign Contact: This function allows you to allocate specific contact(s) to a lead, enhancing communication and collaboration efficiency.
- Primary Contact: The main communication point within a lead organisation. This individual manages the relationship with the lead and addresses any needs or concerns related to the process. To select any contact as the primary contact, toggle the Primary Contact option under the Contacts section upon assigning contact(s).
- Delink Contacts: This feature enables you to detach specific contact(s) from a lead.
- Assign Contact: This function allows you to allocate specific contact(s) to a lead, enhancing communication and collaboration efficiency.
- Activity: The activity log records all interactions, updates, and changes related to the lead, providing a chronological history of events and activities.
Information: To read more on lead activity, click here: Lead Activities.
- Mail: Enables communication with lead via email. Records all emails associated with the specific lead.
Information: To read more on lead mails, click here: Lead Mails.
- Notes: You can add, edit, and view notes about the lead, including meeting notes, important details, and reminders, helping to maintain comprehensive lead records.
Information: To read more on lead notes, click here: Lead Notes.
Note: The Notes Category drop-down field in the pop-up is populated based on the Notes Category Master associated with the lead. To read more on notes category, click here: Notes Category.
- Meeting: This feature allows you to schedule, manage, and track meetings with the leads, including invitations, agendas, and follow-up actions.
- Document: You can upload, store, and manage documents and files relevant to the lead, such as contracts and agreements ensuring easy access and sharing.
Information: To read more on lead documents, click here: Lead Documents.
- Team: This section displays the team members or users assigned to work on tasks related to the lead, facilitating collaboration and teamwork.
Information: To read more on lead relationship team, click here: Lead Relationship Team.
- SMS: Enables sending SMS messages to contacts linked to the lead. To read more on how to configure SMS templates, click here: Configure SMS Templates.
- Call: Provides easy access to call logs, showing the total number of calls for each lead and offering the option to log manual calls for accurate tracking.
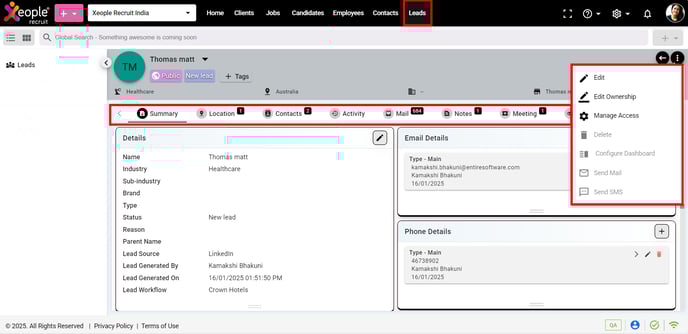
Actions to perform under the three-dot button:
- Add a Lead: Allows you to create a new lead.
- Edit: Enables you to modify the lead's details such as name, contact information, etc.
- Edit Ownership: Allows you to change the ownership of the lead record.
- Manage Access: Provides options to control and adjust access permissions for the lead.
- Send Mail: Facilitates sending emails to contacts associated with the lead.
- Send SMS: Enables sending SMS messages to contacts linked to the lead.
Note: To enable the Send Mail and SMS options, navigate to the lead's Contacts section and select the desired contacts to send emails or SMS.
Information: Leads cannot be deleted from the XeopleRecruit application to ensure data integrity and maintain consistency. Removing lead records could disrupt historical data, impact reporting accuracy, and compromise the continuity of client relationships. Additionally, legal and business regulations often require organisations to retain lead records for compliance, auditing, and future reference.