Job Action encompasses tasks performed on candidate(s) linked to a job posting, facilitating efficient candidate management throughout the hiring process. These tasks include viewing the job application (shows candidate details and screening questions via application form if mapped to a job), adding notes, scheduling interviews, sharing personnel to EOH (as an applicant or member), changing candidate status etc. Additionally, it aids in managing and executing candidate-client-job relations against a job.
To navigate to the Job Actions page from the List View, follow these steps:
- Navigate to the main navigation header bar and click on Jobs.
- Click on a Job Workflow and select a job from the list below.
Optional Reading: How Job workflow and its stages works, click here: Setup a New Job Workflow Hiring Process & Understanding Job Workflow and its stages.
- Click on the three-dot button and select View Job.
- Select a candidate and click on Actions or directly click on the Candidate Name.
Recommend Reading: How to configure the tabs on the Job Action window from the Job Automation Masters, and to understand the impact of the configuration on the Job Action window, click here: Configure Job Automation Masters.

Job Summary Page - Select Candidate - Action
- This action will open the Job Action screen. At the top, you will see the Meeting, Checklist and Comment tabs.
Recommend reading: To read more on how to configure checklist from the masters, click here: Recruiter Checklist.
The Comment button at the top is clickable, opening a pop-up screen where you can view existing comments or add new ones. The Comment button displays the total number of comments as a number. If multiple candidates are selected, it shows the total number of comments for all candidates.
- You can also view the Stage, Job details, Client details, and Job location at the top center of the page.
- On the right-hand side, you will see the forward and backward buttons, which allow you to navigate through candidates in the same stage, switching to their respective screens.
- The 1, 2 and All represent the full mode screens.
The Job Action screen is divided into two sections: Action and Manage. The Action screen allows you to take actions such as adding notes, scheduling interviews, sharing personnel with EOH (as an applicant or member), and changing candidate status, etc. The Manage screen helps you oversee and execute candidate-client-job relationships for a specific job.
Upon clicking on the 1 it will open the action screen in full screen mode. Similarly, 2 will open the manage screen and All will open both the screens. The All screen is the default one.
- The action screen reflects certain default tabs like the Application, Notes, Interview, EOH, Status, etc., as configured from the Job Automation masters. You can configure the tabs and customise names as per your needs.
The sequence set in the Job Automation Master will reflect in the Job Action window for all the stages. For example, if the sequence is Notes first, Application second, and Interview third, you will see the tabs in this order. This sequence will be consistent across all stages for the candidate, except for stages with no stage type mapped.
If information is saved in any tab before moving to the next stage, it remains saved in the backend even if that tab is temporarily hidden from the Job Automation Masters. Once the tab is re-enabled for that stage, the previously saved information becomes visible.
-
- Applications tab: Shows a consolidated PDF of the candidate’s details captured either from the Application Form or through Native Apply (without application form). The PDF format includes multiple fields, and the system extracts whatever data is available from the candidate’s source. For example, if your Application Form includes a Notice Period field but SEEK’s Native Apply does not, that field will appear blank or with a default value in the PDF.
- The PDF displays:
- Logo : Displays the set Organisation logo. Set in the Application Form>Welcome Page.
- Job Details: Job Title, Organisation Name, Job Reference ID and Date Applied.
- Source Field: Allows you to identify where the candidate was sourced from. For e.g., Application Form.
-
Candidate Information: Profile Picture, Title, First Name, Last Name, Email, Phone, Gender, Date of Birth (DOB), Qualification/Role and Address.
-
Professional Details: Current Salary, Notice Period, Skills, Experience, Education.
- Attachments: Resume, Cover Letter (if provided) (will display only the file name).
- Screening: Knockout Questions and the candidate’s responses. Correct responses are highlighted in green and incorrect responses in red.
- The SEEK profile fields displayed in the split-screen view are automatically mapped to the corresponding fields in the application form as follows:
- The PDF displays:
- Applications tab: Shows a consolidated PDF of the candidate’s details captured either from the Application Form or through Native Apply (without application form). The PDF format includes multiple fields, and the system extracts whatever data is available from the candidate’s source. For example, if your Application Form includes a Notice Period field but SEEK’s Native Apply does not, that field will appear blank or with a default value in the PDF.
|
SEEK Profile Field |
XR Application Form Field |
|
First Name |
First Name |
|
Last Name |
Last Name |
|
Email Address |
Email Address |
|
Phone Number |
Phone |
|
Resume |
Resume |
-
- Source in the application form varies based on the Apply Type (Link Out and Native Apply) and Share Job Application Form. Here are few examples:
- In case of Native Apply: The Source is recorded based on the platform from which the candidate initiates the application (e.g., SEEK), while the application is completed within the system.
- Source in the application form varies based on the Apply Type (Link Out and Native Apply) and Share Job Application Form. Here are few examples:
Optional Reading: How Native Apply work in details, click here: Posting Job via Seek.


Split Screen Page – Application - Native Apply- Source - Seek
-
-
-
In case of Link Out - Apply with SEEK:
-
Case 1: When a new candidate applies for a job, the Master Source is recorded as the originating platform (e.g., SEEK).
- Upon clicking the candidate’s name, the Job Action screen will open, and under Candidate Applications, the Source will be reflected.
-
-
-

New/Existing Candidate applying via SEEK Link Out - Source - SEEK

Split Screen Page – Application – Seek (Link Out) for New/Existing Candidate - Source – SEEK
-
-
-
Case 2: When an existing candidate in the XR application applies for another job, the existing Master Source remains unchanged, while the Child Source is recorded as Application Form.
- Upon clicking the candidate’s name, the Job Action screen will open, and under Candidate Applications, the Source will be reflected.
-
-

Existing Candidate Applying via Share Job Apply Page link (Application form) - Source - Application Form

Existing Candidate Applying via Share Job Apply Page link (Application form) - Source - Application Form
-
-
- Case 3: Existing Candidate Accessing Application Form Directly using Apply with SEEK
- When an existing candidate, originally created through SEEK Link-Out, directly accesses the XR application form URL (shared job apply page link) (e.g., via a bookmarked or copied link) and applies to another job using Apply with SEEK, the application source will be recorded as Application Form.
- However, the Candidate Summary will continue to display the original master source based on how the candidate profile was first created. For example, candidates initially created through SEEK Link-Out will retain the master source as SEEK.
- Case 3: Existing Candidate Accessing Application Form Directly using Apply with SEEK
-
-
-
-
-
Upon clicking the candidate’s name, the Job Action screen will open, and under Candidate Applications, the Source will be reflected.
-
-
-

Candidate Summary - Master Source - SEEK
Optional Reading: How Link Out works in details, click here: Job Posting – Link Out.
-
-
- Application Form – Shared – Share Job Apply Page Link: The Source is recorded as Application Form, as the candidate directly accesses the shared job apply page link.
-
Optional Reading: How the Shre Job Apply Page Link feature works: Share Job Apply Page Link.


Application – Share Job Apply Page Link – Source - Application Form
-
-
- If the candidate is knocked out based on application form configuration or knockout settings, the PDF will display a clear Knocked Out watermark, along with the specific responses that triggered this outcome. To read the Knockout toggle cases in detail, click here: Configure Job Application Form - Knockout.
-
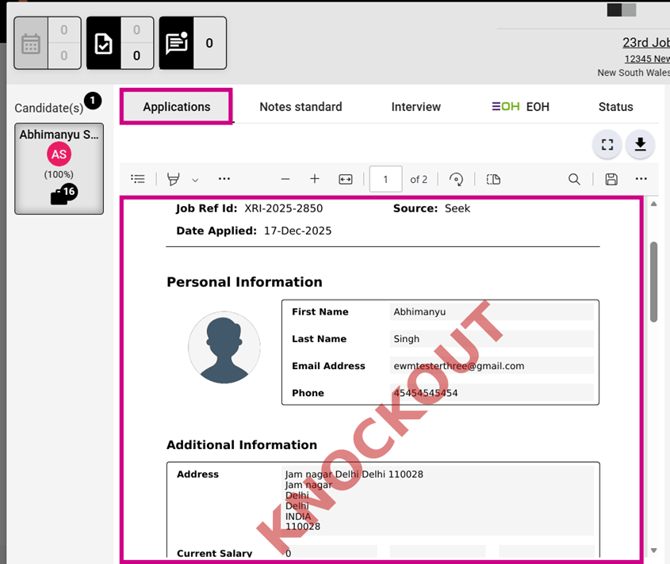
Job Summary – Candidate Checkbox – Applications – Knockout
-
-
- For Knocked Out candidates, the logs are maintained in the system as follows:
- Job Summary > Job Log – Donna Reynolds applied through the Application Form, was marked as Knocked Out, and moved to the Rejected workflow stage (with timestamp).
- Candidate Summary > Activity – Donna Reynolds was assigned to the Business Analyst job (Ref ID: VX02) and marked as Knocked Out.
- System Settings > System Audit Log:
- John successfully applied for the job “Business Analyst” (Ref: 990) via the Application Form.
- John applied for the job “Business Analyst” (Ref: XR-990) via the Application Form and was marked as Knocked Out.
- For Knocked Out candidates, the logs are maintained in the system as follows:
-
- Similarly, you can view the application form via Job Summary > List View > Three-dot menu next to the candidate > View Application.
-
- Notes: This tab is used to add candidate specific notes against a job.
- To view notes, click the link at the top. You will then see an Edit Notes link; clicking it will redirect you to the Job Notes section where you can make edits. This action will be recorded in the Job Log.
- Interview: This tab is used to schedule candidate specific interview against a job.
- Meeting/Task Placeholder Use Cases
- Case 1: Single Candidate Attendee for a Job-Related Meeting
-
Scenario: Meeting/Task is related to a Job and one Candidate is selected as a Required Attendee.
- Result: The (Jobs.Candidate.Name) placeholder is replaced with the candidate's name in both the Email Preview and the received email.
-
- Case 1: Single Candidate Attendee for a Job-Related Meeting
- Meeting/Task Placeholder Use Cases
- Notes: This tab is used to add candidate specific notes against a job.
-
-
-
- Case 2: Multiple Candidate Attendees for a Job-Related Meeting
- Scenario: Meeting/Task is related to a Job and multiple Candidates are selected as Required Attendees.
- Result: The (Jobs.Candidate.Name) placeholder is not replaced in either the Email Preview or the received email because the system cannot determine a single candidate.
- Case 2: Multiple Candidate Attendees for a Job-Related Meeting
-
-
-
-
-
- Case 3: Client, Employee, or Contact Attendee for a Job-Related Meeting
- Scenario: Meeting/Task is related to a Job and the attendee is a Client, Employee, or Contact.
- Result: All applicable placeholders are replaced except (Jobs.Candidate.Name) in both the Email Preview and the received email.
- Case 3: Client, Employee, or Contact Attendee for a Job-Related Meeting
-
-
-
-
-
- Case 4: Required and Optional Attendees Selected
- Scenario: Meeting/Task is related to a Job and both Required and Optional Attendees are selected.
- Result: Placeholder values are replaced using the Candidate selected in the Required Attendees section only. The same values appear in the Email Preview and the received email.
- Case 4: Required and Optional Attendees Selected
-
-
-
-
-
- Case 5: Delete Interview
- Scenario: User deletes an interview.
- Result: The interview is deleted successfully without affecting placeholder functionality.
- Case 5: Delete Interview
-
-
-
-
-
- Case 6: Client or Candidate Meeting Using a Job Placeholder Template
- Scenario: Meeting/Task is related to a Client or Candidate, but a Job-based placeholder template is selected.
- Result: Job-related placeholders are not replaced in the Email Preview or the received email because no Job context exists.
- Case 6: Client or Candidate Meeting Using a Job Placeholder Template
-
-
-
-
-
- Case 7: Client Meeting Using a Client Template
- Scenario: Meeting/Task is related to a Client and a Client placeholder template is selected.
- Result: All Client placeholders are correctly replaced in both the Email Preview and the received email.
- Case 7: Client Meeting Using a Client Template
-
-
-
-
-
- Case 8: Candidate Meeting Using a Candidate Template
- Scenario: Meeting/Task is related to a Candidate and a Candidate placeholder template is selected.
- Result: All Candidate placeholders are correctly replaced in both the Email Preview and the received email.
- Case 8: Candidate Meeting Using a Candidate Template
-
-
-
-
-
- Case 9: Candidate Meeting with Candidate Attendees
- Scenario: Meeting/Task is related to a Candidate and a Candidate placeholder template is selected. Additional candidates may be selected as attendees.
- Result: Placeholder values are populated using the Candidate selected in the Related To field, not the candidates selected as attendees.
- Case 9: Candidate Meeting with Candidate Attendees
-
-

Interview - Jobs - Related to Single Candidate

Inserted Template - Jobs.CandidateName

Email Preview - Jobs.CandidateName Dynamic Placeholder Replaced with Value

Interview - Jobs - Related to Multiple Candidate

Email Preview - Jobs.CandidateName Dynamic Placeholder Not Replaced with Value
-
- EOH tab allows you to screen and share a candidate to EOH, with or without creating an applicant portal.
- Under the EOH tab, you'll find four sections for pushing a candidate as an applicant: Candidate Profile, Screening Action, Notes, and Review & Final Summary.
- Under the EOH tab, you'll find four sections for pushing a candidate as a member: Candidate Profile, Notes, Employment Status, and Review & Final Summary. The Candidate Profile tab for both opens by default when you click EOH.
- EOH tab allows you to screen and share a candidate to EOH, with or without creating an applicant portal.
- Status: This tab is used to update a candidate status against a job. Additionally, you can restrict the candidate to apply for any new job application to a specified time period by clicking on the checkbox at the bottom.

Job Action - Default Tabs
To check the functioning of the EOH tab, follow these steps:
Recommend reading: How to configure EOH from the marketplace, click here: Marketplace Configuration - Entire OnHire (EOH). Subscribe to the feature Share Personnel to EOH under the EOH tab in the Marketplace.
The integration status will display as Connected. If EOH is not connected, it will read Integration Status: Not Connected, prompting you to connect the account through the Marketplace. If the status is Not Connected, a clickable link labelled Click here to Integrate will appear below to redirect you to the EOH Marketplace connection page.
- Candidate Profile Tab: Displays basic candidate information pre-filled from XR. Additional details, including professional information (EOH + XR mapping) and office will be retrieved from the EOH API. You can switch between the Applicant and Member tabs based on the profile type being pushed. This is a case of pushing a candidate as an Applicant. Complete the required fields and click Next.
|
||
|
Field Name |
Data Source / Behaviour |
Mandatory Rule |
|
Title |
XR system-defined dropdown. Select manually if not extracted from the candidate summary (e.g., Mr, Mrs, Miss, Ms, Dr, Prof). |
Mandatory |
|
First Name |
Given name. Prefilled from the candidate summary (XR). |
Mandatory |
|
Family Name |
Surname. Prefilled from the candidate summary (XR). |
Mandatory |
|
Gender |
Prefilled from the candidate summary (XR), if exist or choose manually. XR system-defined dropdown. |
Optional |
|
Date of Birth |
Prefilled from the candidate summary (XR), if exist or choose manually. Functions like a calendar; future dates are not allowed |
Optional |
|
Contact Details |
||
|
|
Candidate’s active email address. Prefilled from the candidate summary (XR). Unique identifier. |
Mandatory |
|
Code |
Candidate’s country/area code. Country code defaults to +61 (Australia). As set under the System Settings → Internationalisation. |
Mandatory |
|
Phone Number |
Candidate’s contact number, if exist. Prefilled from the candidate summary (XR), if exist or choose manually. |
Mandatory |
|
Professional Details |
||
|
Industry |
|
Mandatory |
|
Qualification/Role |
|
Mandatory |
|
Address |
||
|
Address (Link to Map) |
Candidate’s residential address. Prefilled from the candidate summary (XR), if exist or choose manually. |
Optional |
|
Address Line 1 |
Prefilled from the candidate summary (XR), if exist or choose manually. |
Optional |
|
District/Suburb |
Local area or neighbourhood. Prefilled from the candidate summary (XR), if exist or choose manually. |
Optional |
|
Country |
Nation name. Prefilled from the candidate summary (XR), if exist or choose manually. |
Optional |
|
State |
State or region. Prefilled from the candidate summary (XR), if exist or choose manually. |
Optional |
|
Postal Code |
Area mail code (PIN). Prefilled from the candidate summary (XR), if exist or choose manually. |
Optional |
|
Additional Details |
||
|
Office Applying For |
Drop-down with all values extracted via the EOH API. If you don’t select any office the default head office from EOH is selected. |
Mandatory |
|
Upload Resume |
Prefilled from the candidate summary (XR), if exist. CV parsed data will be pushed to EOH. The CV parsed data is currently displayed under Talent Search in EOH. |
Mandatory |

Split Screen - EOH - Share as Applicant
Recommend reading: To read more on pushing candidate as a member, click here: Push Candidate as a Member.
- Screening Action tab:
- Recruiter Name: The first field, Recruiter Name, is mandatory and presented as a single-select drop-down menu sourced from connected EOH account recruiters. Initially, no recruiter is selected, but upon user selection, the chosen recruiter’s name will be displayed.
- Candidate Screening Status: This field indicates whether the candidate has progressed from the Screening stage to the next. If the candidate has moved past this stage, the screening status will be marked as complete, and the checkbox will be ticked; otherwise, it will show as incomplete, with the checkbox unticked.
- Candidate Interview Status:
- If the candidate advances from the Interview stage and the Interview date and time have been scheduled, the system will mark this as complete. The Interview stage is defined by the stage type Interview mapped to any workflow stages. Once the candidate moves past this stage, the candidate interview status will display as complete, with the checkbox ticked. If not, it will display as incomplete, and the checkbox will remain unticked.
- If you manually select the Candidate Interview Status checkbox as COMPLETED, selecting the Interview Date and Time becomes mandatory. For a single interview, the date and time slot are disabled, and data auto-populates. If multiple interviews are upcoming, you must select an Interview Date and Time before pushing the candidate with the RECRUITMENT - APPLICANT LOGIN & SCHEDULED INTERVIEW option. If no interviews are scheduled, these fields will be blank and disabled.
- The Interview Date dropdown includes past, current, and future dates. Interviews scheduled for today and future dates (including past time slots within the current day) are categorised under the Interview Stage, whereas interviews with past dates are moved to the Reschedule Stage in EOH. Example (past time slots within the current day): For instance, if the current date is 10 April and the time is 3:00 PM, an interview scheduled earlier the same day at 11:00 AM will still fall under the Interview Stage, even though the time has already passed.
- You can manually toggle the checkboxes for Candidate Screening Status and Candidate Interview Status as needed.
- To create the application portal, users will be presented with three options displayed as radio buttons, allowing selection of only one:
- RECRUITMENT - INBOX: Creates a new applicant without screening, interview appointment, or Applicant Portal access. This option only passes applicant information to EOH without creating applicant portal details, placing the applicant in the Inbox section of the EOH account.
- RECRUITMENT - APPLICANT LOGIN ONLY: Creates a new applicant and provides access to Applicant Portal credentials only. This option creates applicant login credentials and shares them with the applicant.
- RECRUITMENT - APPLICANT LOGIN & SCHEDULED INTERVIEW: Creates a new applicant and provides access to Applicant Portal credentials along with booked / rescheduled interview schedule. This option creates applicant login credentials and shares them with the applicant, along with interview details.
- These options will be available based on certain conditions. For example, if the Screening Status is INCOMPLETE, only the first two options will be enabled for selection, while the third option will be disabled.
- To send an email to the applicant, check the corresponding option. When selected, it enables the dropdown menu for selecting an email template. It's mandatory to choose an email template if the send email option is checked. The email will not be sent in case of the Recruitment - Inbox, in case of the other two the email will be sent to the applicant.
- The Email Template option will remain disabled unless the Send Email to Applicant box is checked. It's a dropdown single-select menu, showcasing all available Email Templates in the connected EOH account. Upon selecting a template, its name will be displayed in the field.
- For candidates not pushed to EOH, tabs below will remain active and enabled, while for those already pushed, a text will appear saying Candidate already pushed to EOH.

Job Action - EOH - Screening Action

Staff Portal - EOH - Onboarding Dashboard - Interviews/Reschedule
- Notes tab:
- There are two sections within the tab:
- Screening Notes: If any notes are saved under the Screening Notes category for this candidate and job, they will be displayed in this section. If no notes are saved, this section will be blank. You can then make changes or additions based on your requirements. Any modifications made here will not affect the data saved in XeopleRecruit; they will only be reflected in EOH when you transfer the candidate as an Applicant.
- Additionally, the timestamp icon is clickable, and clicking it will auto-populate the Username, Date, and Time.
- Employment Status Notes: This section is blank by default. Employment Status notes will only appear when pushing the candidate as an applicant with Interview details. In the other two cases, Employment Status notes will be disabled. It's a simple text box to comply with the EOH format.
- There are two sections within the tab:

EOH - Notes
- Review and Final Summary tab provides users with a convenient overview of all information before pushing the candidate to EOH.
- The Review and Final Summary tab displays all saved data from the preceding three sections: Candidate Profile, Screening Action, Notes. None of the fields in this section are enabled; you must navigate to the appropriate tab to make changes.
- Share Personnel: This option functions similarly to the existing application. Data is transferred to EOH based on selections made across all three tabs of the screen. If any required fields are left incomplete, the Share Personnel icon will be disabled, accompanied by an error message indicating that the mandatory fields must be completed.

EOH - Review and Final Summary
Candidate (as an applicant) Data Sync Fields:
|
Fields |
Sync (↔) |
|
First Name |
XR ↔ EOH |
|
Last Name |
XR ↔ EOH |
|
Phone Number (Main) |
XR ↔ EOH |
|
Gender |
XR ↔ EOH |
|
DOB |
XR ↔ EOH |
|
Address (Location Details - Default) |
XR ↔ EOH |
The ↔ symbol indicates two-way sync, meaning any updates in XR automatically reflect in EOH and vice versa.
XR → EOH Profile Sync (Duplicate Check)
When a profile is pushed from XR to EOH, the system checks for existing profiles in EOH to prevent duplicates.
Matching rules
A profile match is checked using any one of the following:
- Email, or
- Mobile number
System behaviour:
- No match found → A new profile is created in EOH.
- One match found → The system shows an alert that a matching profile exists and asks if you want to sync. If you confirm, the profile is synced with the existing EOH profile.
- Multiple matches found → The system stops the process and shows a Multiple Profile Error.
Example
- A profile is pushed from XR with:
- Email: john.doe@email.com or +614658349
Scenario 1:
- One EOH profile matches the email.
- The XR profile syncs with the matching EOH profile.
Scenario 2:
- Two EOH profiles match the same mobile number.
- The system does not sync and displays a Multiple Profile Error.
Outcome:
This logic prevents duplicate profiles, keeps data accurate, and flags ambiguous matches instead of auto-merging them.
When you share an applicant, if EOH detects duplication and the applicant's status is inactive, XR displays a message: This candidate already exists in EOH with Applicant ID: MB0002, Applicant Status: Terminated. Do you still want to share this candidate as an Active applicant? If you select Yes, XR updates the applicant status to Active. If you select No, XR will restrict the user to push candidate as an applicant.
You can manage and take actions on the candidate, client and the specific job from the screen on the right-hand side.
Under the candidate, you can check resume and activity, send emails, add notes, etc. Under the client, you can check client activity, send emails, add notes, and review client contacts.
Under the job, you can view job details, manage documents, and add notes.
Each tab consists of a Manage button which will redirect you to the specific section. For example: Job>Notes>Manage>Job summary>Add notes.
Optional Reading: How the Client VS Job Document, Candidate VS Application Document, Client VS Job Notes Log, Candidate VS Application Notes Log relationship works, click here: Client VS Job Document, Candidate VS Application Document, Client VS Job Notes Log, Candidate VS Application Notes Log.

Manage - Candidate, Client and Job
- In the List View, to take action on multiple candidates, select the checkbox beside each candidate, then click the three-dot button and choose Actions.
Remember this option will be only enabled if candidates selected are in the same stage. If not, this will be disabled.

Job Summary Page - List View – Actions
If an applicant has already been pushed to EOH and you want to share the same record as a Member, they can do so. The applicant details will remain disabled, as per the current system behaviour. However, when you select the Member option, all previously shared applicant details will be prefilled, and the corresponding record in EOH will be updated as a Member. The Member ID will then be displayed, with the details remaining disabled on each page.
If a member has already been pushed to EOH, the user cannot share the same record as an applicant, as the applicant form page should be disabled.
Recommend reading: To view how the applicant and their details appear in Entire OnHire, click here: Applicant Profile.