A job application form is a standardised document that employers use to collect personal, educational, and professional details from job applicants. Its purpose is to ensure consistency and efficiency in the hiring process, allowing employers to easily compare candidates, filter out unqualified applicants, and maintain comprehensive records for future reference and compliance.
To add an Application Form, follow these steps:
- Click on the Profile picture and select Administrator from the drop-down menu.
- Click on Master Data from the left navigation panel.
- Under the Job Master Data, select Application Form.
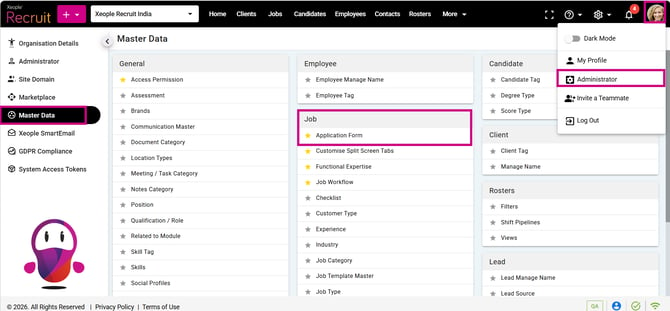
Administrator - Master Data - Application Form
- Click on (+) button on the top to add an application form.
- Enter the detail and click Save & Continue.
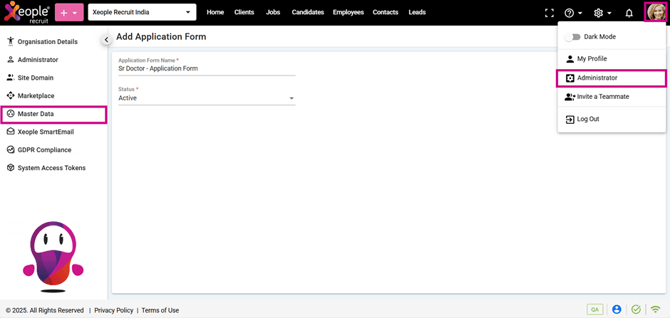
Profile Picture - Administrator - Master Data - Job - Application Form - Add
- This opens the Configure Application Form page, where the form name is displayed in the header for easy identification. The page consists of multiple sections for configuration.
Section names like Welcome Page, Knockout Questions, etc., are customisable. You can define them according to your needs. To do so, click the Edit (Pencil) button.
-
-
Welcome Page:
- Banner Image: Upload an image to display at the top of the application form page.
- Heading: Enter the main title that will appear on the banner image.
- Sub-heading: Enter the supporting text that will appear below the heading on the banner image.
-

Welcome Page – Banner Image/Heading/Sub Heading
-
-
- Optionally include an About Us section About Us: Enter a description of your organisation that will be displayed to candidates on the application form (this information will appear on the application form and job description page).
-
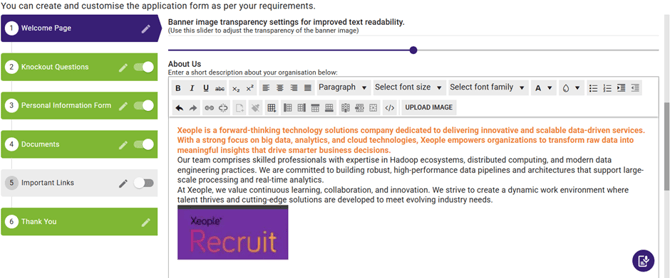
Welcome Page – About Us
-
-
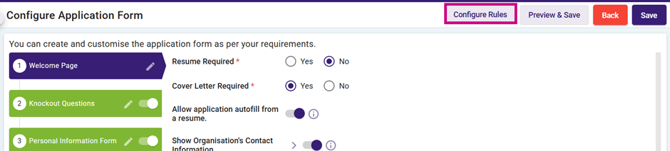
- Resume Required: If set to Yes, candidates must upload a resume; if No, it is optional.
- Cover Letter Required: If set to Yes, candidates must provide a cover letter; if No, it is optional.
- Allow application autofill from a resume: If ON, the Auto-fill with resume option will appear on the application form and prefill details from the uploaded resume; if OFF, candidates must enter all details manually.
- Show Organisation’s Contact Information: If ON, the organisation’s contact details are visible to candidates; if OFF, they are hidden.
- Organisation Logo: If uploaded, the logo is displayed on the application form; if not, no logo is shown.
- Show Recruiter’s Information: If a recruiter is selected from the drop-down, their details (name and email) will be visible to candidates on the application form; if not selected, no recruiter information will be shown.
-

Welcome Page – Other Fields – Configure
-
-
- The Configure Rule section allows you to restrict candidates with specific statuses from applying for a job position. You can also customise email and alert messages to prevent these candidates from applying for the same job. Upon configuring all the details click Save.
-
Application Form - Welcome Page - Settings - Configure Rules
-
-
-
Select the Candidate Status you would like to have banned.
- Configure the email template
- Configure the alert on the screen.
-
-
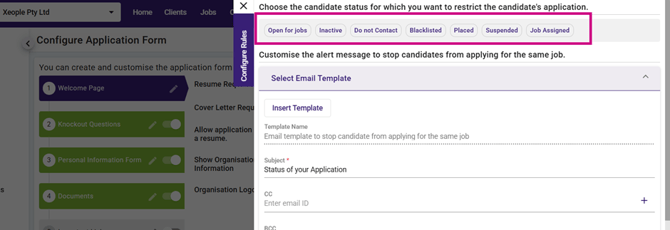
Configure Rules - Restrict Candidate Applications
For sections like Knockout Questions, Personal Information Form, Documents, and Important Links, you need to enable the toggle to configure them.
-
-
Knockout Questions: Add screening questions and choose whether a failed response (if candidate replies do not match the desire responses configured here) should block the candidate from applying or let them proceed. This helps quickly identify and eliminate unsuitable candidates based on predefined questions.
- The End Application Togglecontrols whether candidates should be blocked or allowed to continue the application process when their responses do not match the desired answers configured for knockout questions.
- End Application Toggle ON: If a candidate provides a response that does not match the configured desired answer, the application ends immediately and the candidate cannot proceed further.
- No candidate record is created through the Application Form.
- In both Share Job Apply Page and SEEK > Apply Type > Link Out > Application Form, the candidate is not created or mapped to the job.
- End Application Toggle – OFF: If a candidate provides a response that does not match the configured desired answer, the candidate can still continue and submit the application.
- Candidate record is created in the Candidate module.
- In both Share Job Apply Page and SEEK > Apply Type > Link Out > Application Form, the candidate is mapped to the Job. The candidate is moved to the Rejected stage mapped to Rejected stage type. If no Rejected stage is mapped to a rejected stage type, the candidate is mapped to the first stage of the workflow (for example: Applied).
- End Application Toggle ON: If a candidate provides a response that does not match the configured desired answer, the application ends immediately and the candidate cannot proceed further.
- The End Application Togglecontrols whether candidates should be blocked or allowed to continue the application process when their responses do not match the desired answers configured for knockout questions.
-
-
-
-
- End Application Toggle ON/OFF: If the candidate’s responses match the configured desired answers, the candidate can continue and complete the application successfully.
- Candidate record is created in the Candidate module.
- In both Share Job Apply Page and SEEK > Apply Type > Link Out > Application Form, the candidate is mapped to the first stage of the workflow (for example: Applied).
- End Application Toggle ON/OFF: If the candidate’s responses match the configured desired answers, the candidate can continue and complete the application successfully.
-
-
For Seek > Apply Type > Native Apply (with Application Form), this is not affected by the toggle functionality. Only Knockout (Screening) Questions are considered. If the candidate answers all questions as configured, they are created in the Candidate module and mapped to the job in the Applied stage. If the answers do not match the configuration, the candidate is mapped to the Rejected stage.
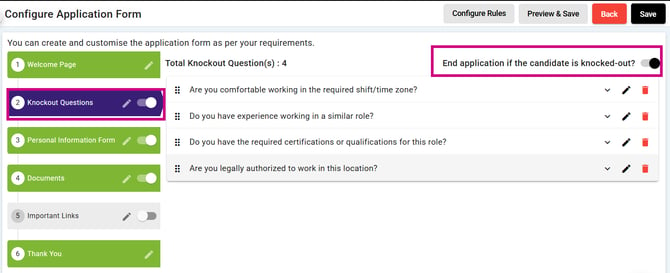
Knockout Questions – End Application – Candidate Wrong Answers – Toggle
-
-
- Click the (+) Add button at the top right of the screen to add screening questions. Each question offers two response options: Yes or No.
-
You can add up to 15 knockout (screening) questions — this is the maximum limit. You can also configure Application Form by clicking the three-dot menu in front of it and selecting Configure.
Don’t forget to click Save after adding questions — saving from the top right of the screen is mandatory to apply changes in each section.
Optional Reading: How the job workflow works, click here: Understanding Job Workflow and its stages.
-
-
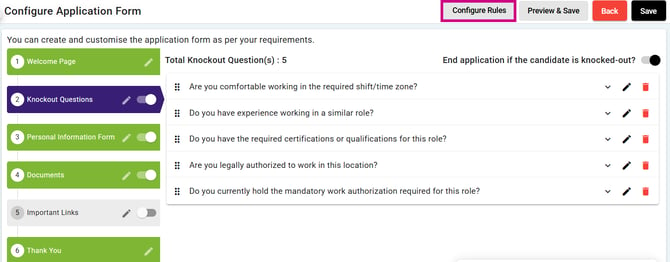
- Upon adding the knockout questions, you can Edit or Delete and Save it as per your requirement.
-
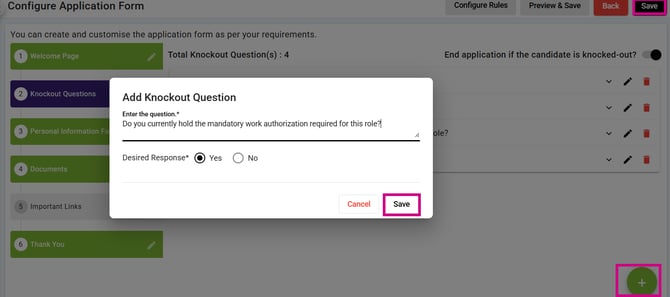
Application Form - Knockout Questions - Add - Configure Rules
- The configure rule page lets you set up email and alert message in case of knockout.
Knockout Questions – Configure Rule
- Ensure to Configure email template to send to them as well as the alert message to show on the page.
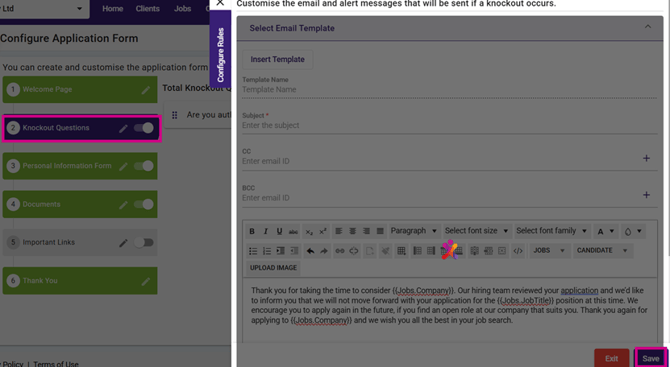
Knockout Questions – Configure Rule – Email Template
How Knockout Questions appear on the job posting form:
While posting a job, if you select Native Apply and enable the Screening Questions checkbox, the Application Form becomes mandatory and a separate Screening Questions page opens, showing the configured Knockout Questions.
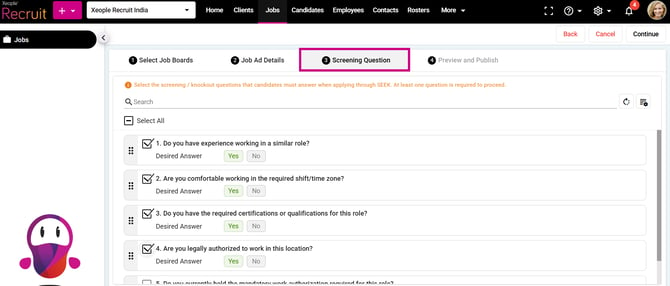
Job Posting – Seek – Screening Questions – Application Form
Candidate Knockout Information in the System:
For Knocked Out candidates, the logs are maintained in the system as follows:
- Job Summary > Job Log – Donna Reynolds applied through the Application Form, was marked as Knocked Out, and moved to the Rejected workflow stage (with timestamp).
- Candidate Summary > Activity – Donna Reynolds was assigned to the Business Analyst job (Ref ID: VX02) and marked as Knocked Out.
- System Settings > System Audit Log
- John successfully applied for the job “Business Analyst” (Ref: 990) via the Application Form.
- John applied for the job “Business Analyst” (Ref: XR-990) via the Application Form and was marked as Knocked Out.
-
-
General Information Form: To collect information from candidates. This section let you configure the details needed from the candidates. Like the Title, First/Last Name, Profile Picture, Email, Phone Number, DOB, Gender, Qualification/Role, etc.
-
Title, Gender, Date of Birth (DOB), and Qualification/Role are newly added fields in the application form, each with a checkbox to control visibility and a Required toggle to mark the field as mandatory.
These fields have been added to capture more complete candidate information at the time of application, strengthening profile accuracy and supporting more efficient recruitment and onboarding.
Recommend Reading: How the fields work when the candidate(s) apply after sharing the job apply page link, click here to read in depth: Share Job Apply Page Link.
-
-
- Field Selection & Required Toggle: If a field’s checkbox is selected, it will appear on the application form. If the Required toggle is ON, the field becomes mandatory (turns red/pink); if OFF (grey), it remains optional. For example, if Phone Number checkbox is selected but not marked as required, candidates can choose whether or not to fill it.
- Mandatory Fields: First Name, Last Name, and Email (under General Information); Position Name, Employer, and Start Date (under Experience); and Qualification (under Education) are enabled (mandatory) by default. Additionally, if other sections are toggled as Required, candidates must provide details in those sections as well.
-
Recommend Reading: How Qualification/Role works, click here: Qualification/Role.
When you create a job, you define its qualifications/role and skills. The qualification/role can/cannot be mapped to any industry. The same qualifications/role and skills must be configured in the application form, because a single (default) application form can be mapped to multiple jobs.
Additional Sections
Below General Information you'll see further sections including Address, Skill, Additional Information, Experience, and Education. These work the same way — toggle them on to include them on the form and enable the Required toggle if you want to make them mandatory.
-
-
- Upon configuring all the details click Save.
-
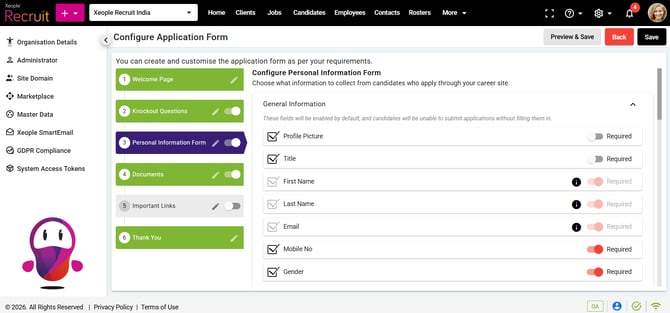
General Information Form – Fields
-
- Documents: Configure this tab to collect required candidate documents. Don't forget to click Save.
- The list of documents is populated based on the Document Category configured in the Master. For more details, refer to: Document Category.
- Each document has the following configuration fields:
- Documents: Configure this tab to collect required candidate documents. Don't forget to click Save.
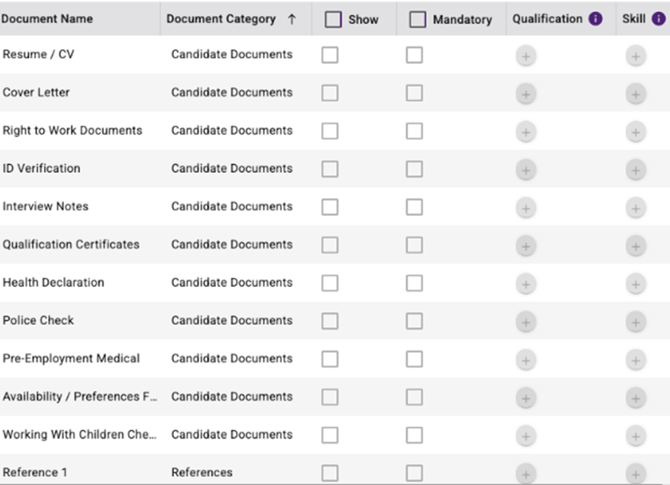
Document – Configure Fields
-
-
-
- Show – Controls whether the document is displayed on the application form.
- Mandatory – Defines whether the document is compulsory for the candidate to upload.
- Qualification/Role – Links the document to specific qualifications/role.
- Skill – Links the document to specific skills.
- How Documents Are Displayed in the Application Form: The visibility of documents in the application form depends on three factors:
- Job Qualification and Skill
- Document Configuration (Show / Mandatory)
- Application Form – Job Mapping
-
-
-
-
- Case 1: Qualification and Skill Match: If the qualification and skill defined in the job match the qualification and skill mapped to the document:
- The document will be displayed on the application form if Show = Yes.
- If Mandatory = Yes, the candidate must upload the document before submitting the application.
- Result: Document is visible (and mandatory if configured).
- Case 2: Qualification and Skill Do Not Match: If the qualification and skill defined in the job do not match the qualification and skill mapped to the document:
- The document will not be displayed on the application form, even if Show is enabled.
- Result: Document is not visible on the application form.
- Case 1: Qualification and Skill Match: If the qualification and skill defined in the job match the qualification and skill mapped to the document:
-
-
-
- Case 3: Application Form Mapped to Multiple Jobs: If the same application form is mapped to multiple jobs:
-
-
-
-
- Only documents whose qualification and skill match the job requirements will be displayed.
- If a document matches some jobs but not others, it will appear only for the relevant jobs.
- Result: Only commonly matched qualifications and skills between the job and application form are shown
-
-
-
- Important Links: Configure the important link like your company policy, about us, etc. Don't forget to click Save.
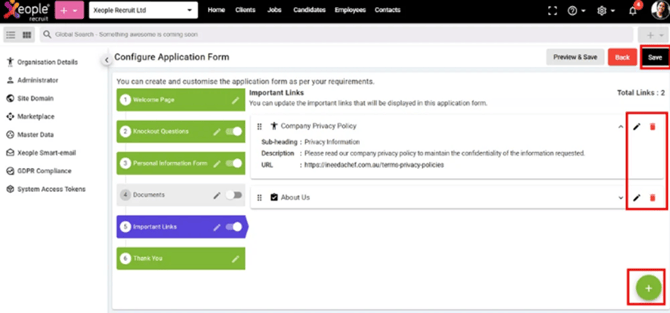
Important Link - Add
-
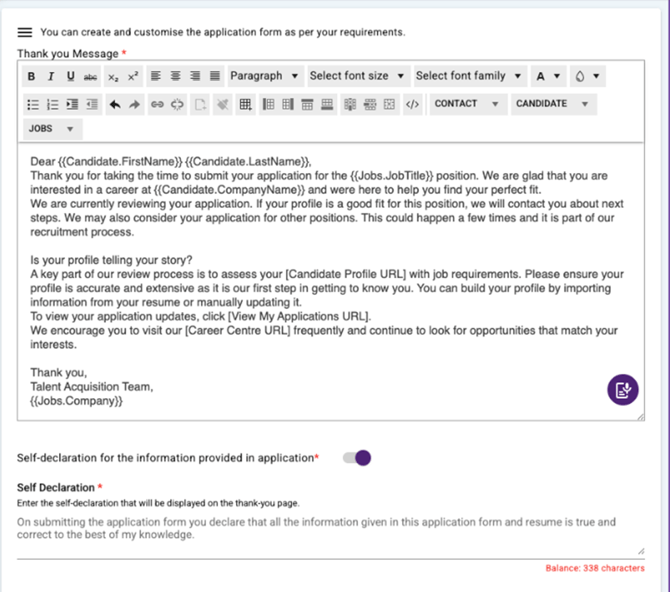
- Thank You Page: Configure the thank you message that applicants will see once they complete the application. Upon configuring all the details click Save.
Application Form - Configure
- Once an Application Form is configured, it can be set as the default. At least one Application Form is always enabled by default, and its toggle remains disabled. You may select another form as the default if required. Only active Application Forms with an active status can be set as default. When creating a job, the default Application Form is automatically mapped to the job, though you can choose a different form from the Create Job screen if needed.
- To Edit, Clone, or Configure an application form, click the three-dot button after the application form is added as needed.
When editing, the Configure Application Form page displays the form name in the header so admins can easily identify which form they are working on and avoid editing the wrong one.
Recommend Reading: How to create a job, click here: Create a Job.
The application form will appear in the list when creating candidates manually. To learn more about how to create a candidate using the application form, click here: Create Candidate via Application Form.
- Upon copying and pasting the link into a new web browser or opening it, the Job Description page will appear.
The Job Description page displays the details entered during job creation and application form configuration. If available, the About Us section appears first; otherwise, the Job Description is shown directly.
When a user shares the job apply page link, it will open the Job Description page. However, if the user is on the job board and the link-out option is applicable, it will directly open the Job Apply page, as it currently functions in the system.
Recommend Reading: How to publish a job with apply type: Link out (redirect to the Job Apply page) and Native Apply (quick apply on seek itself) and how candidates are created when applying in the system and mapped to job, click here: Post Job via Seek, Job Posting - Link Out .
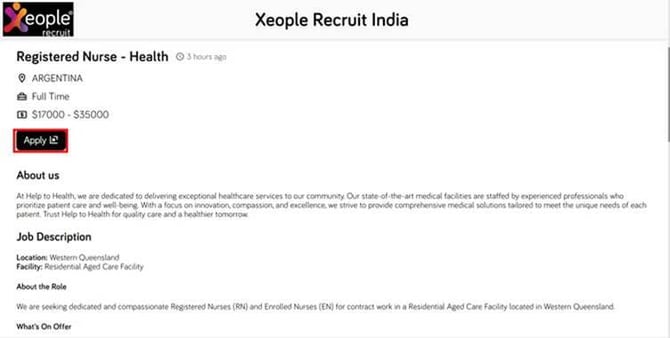
Job Apply Page Link - Job Description Page - Apply
- Upon clicking the Apply button, you will see a job description. Clicking it will open the Job description.
- On the Job Apply page you will see two options: Autofill with resume and Apply Manually select one as per your requirement.
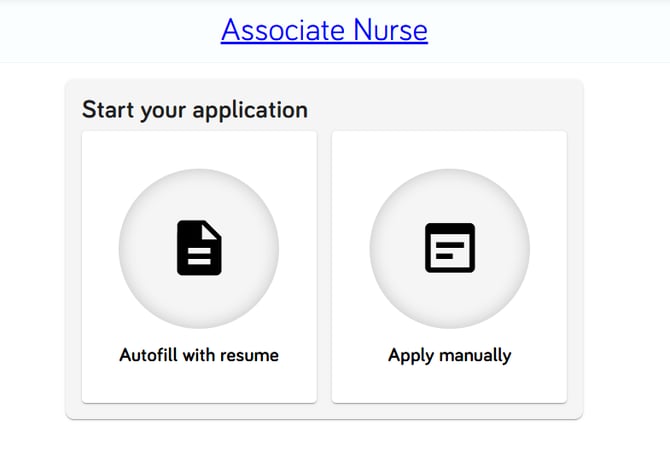
Job Apply Page – Options