
Job refers to a specific employment opportunity or position that needs to be filled within an organisation. It serves as a central hub for all related information, including job descriptions, requirements, candidate applications, and hiring stages, facilitating the recruitment process and enabling efficient management of vacancies.
Creating a job within XeopleRecruit offers several benefits:
-
Jobs provide a structured framework for managing the hiring process, helping you stay organised by centralising all related information in one place.
-
By standardising the process for posting job openings, tracking candidate applications, and managing hiring stages, creating jobs streamlines recruitment workflows and improves efficiency.
-
Job postings clarify the requirements, responsibilities, and qualifications for each position, ensuring that both recruiters and candidates have a clear understanding of what is expected.
-
Jobs promote consistency in the hiring process by establishing uniform criteria and procedures for evaluating candidates, reducing the likelihood of bias or inconsistencies.
-
Creating jobs allows recruiters and hiring managers to collaborate more effectively by providing a centralised platform for sharing information, feedback, and updates throughout the recruitment process.
-
Jobs enable organisations to collect and analyse data related to their hiring efforts, such as application rates, candidate demographics, and time-to-fill metrics, empowering data-driven decision-making and continuous improvement.
-
By documenting job postings, applications, and hiring decisions, organisations can maintain compliance with legal and regulatory requirements governing the hiring process.
Create a Job
Recommend Reading: Prior to creating a job, it's essential to add or configure the Job workflow from the masters. For detailed instructions on configuring a Job Workflow, click here: Setup a New Job Workflow Hiring Process. How Job workflow and its stages work, click here: Understanding Job Workflow and its stages.
You have various ways to create a job in the XeopleRecruit CRM. Click on Jobs in the main navigation header bar to add a job or choose a job workflow and create it from the job landing page. Alternatively, use the quick add job panel located on the top left of the navigation bar.
To add a job from the Jobs options in the main header bar, follow these steps:
- Navigate to the main navigation header bar and click on Jobs.
- Click on the (+) button to check the two options.
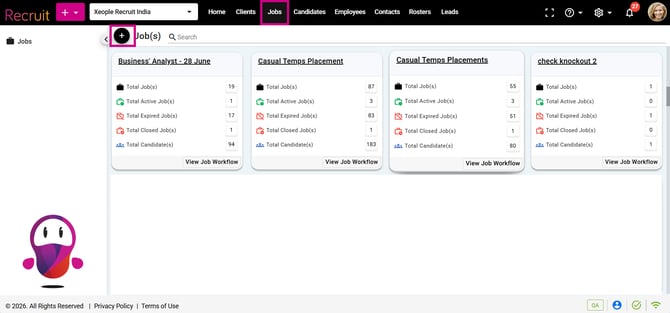
Jobs - Add Job
- Select either Complete a Form or Use a Template based on your preference.
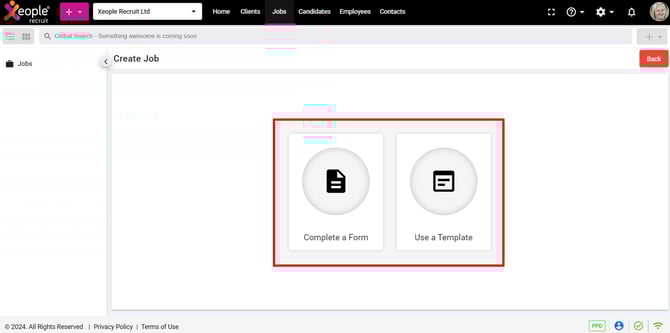
Create a Job - Options
Selecting Complete a Form opens a form for entering job details, while choosing Use a Template provides options to create a new template or use existing ones. For additional information on adding a Job Template, click here: Job Template.
Create Job Fields
EOH-Driven Fields
EOH Office, EOH Industry, and EOH Qualification are EOH application-driven fields. Before reviewing the details of these fields, first understand how EOH Integration and XR Auto Push work and how they determine whether these fields are mandatory or optional. These fields are used when a candidate is automatically pushed from XR to EOH application as an Applicant.
Recommend Reading: How integration of both platform works in detail for auto push, click here: XR → EOH - Auto Push Candidate as an Applicant.
|
Sections |
Fields |
Description |
Notes / Default Behaviour |
|
General |
Job Title |
Name of the job posting. |
Mandatory. |
|
Client |
Select the client for whom the job is being created. |
Optional, drop-down populating all clients created. Single select. |
|
|
Address |
Specifies the job location. |
Optional. Can be selected or added. After adding the address, if the Latitude and Longitude values are not populated, click the Location button to retrieve and populate the coordinates. |
|
|
EOH Office |
EOH application-driven field mapped to the Office Master in the Entire OnHire (EOH) application. Select an Office from the drop-down list populated from the EOH Office Master. The selected Office is used when the candidate is auto-pushed to EOH as an Applicant. |
Mandatory/Optional: This is a single-select field.
The default office configured in the EOH application is automatically retrieved through the EOH API and displayed in this field. When candidates are automatically pushed from XR to EOH as Applicants, the selected office is assigned to their applicant record. |
|
|
Industry (EOH) |
EOH application-driven field mapped to the Industry Master in the Entire OnHire (EOH) application.
|
Mandatory/Optional: This is a single-select field.
By default, the default Industry configured in EOH is retrieved and displayed through the EOH API in this field. Choose Industry from the drop-down list as per your needs and the candidate will be auto pushed with the same value as an applicant. |
|
|
Qualification (EOH) |
EOH application-driven field mapped to the Qualification master in EOH based on the selected Industry. The selected qualification is used when candidates are automatically pushed from XR to EOH application after they apply for a job in XR. |
Mandatory/Optional: This is a single-select field.
Choose a Qualification from the drop-down list populated from the EOH application Qualification Master based on the selected Industry. |
|
|
Job Details |
Job Category |
Categorises jobs based on their function or role. |
Optional, single select field. Values come from the Job Category master. |
|
Job Sub-category |
Further categorises the selected Job Category. |
Optional, multi-select field. Values come from the Job Sub-category master. |
|
|
Industry |
Select the industry applicable to the job. If not selected any, global qualification (not industry specific) will populate when candidates apply via application form. |
Optional, multi-select field. This help candidates select qualifications based on the industry selected when they apply for the job. Values come from the XR Industry master. To read more, click here: Master Data – Industry. |
|
|
Sub-industry |
Select a more specific industry classification. |
Optional, multi-select field. Values come from the Sub-industry master. |
|
|
Qualification / Role |
Select the qualification or role associated with the selected Industry. |
Optional, multi-select field. Values are filtered based on the selected Industry and are populated from the XR Qualification/Role Master. This field is used only to define the qualification(s)/role(s) for the job and does not affect the qualification/role selected by candidates when applying for the job. |
|
|
Skill |
Specifies the skills required for the job. |
Optional, multiple skills can be selected, depending on configuration. |
|
|
Job Type |
Defines the employment type (Full-time, Part-time, Contract, etc.). |
Mandatory, single-select field. |
|
|
Job Sub-type |
Further classifies the selected Job Type. |
Optional, single-select field. |
|
|
Experience |
Specifies the required experience level. |
Optional, single-select field. Values come from the Experience master. |
|
|
Functional Expertise |
Specific skills or knowledge required for the job role. |
Optional, multi-select field. Values come from the Functional Expertise master. |
|
|
Functional Sub-expertise |
Provides a more detailed functional classification. |
Optional, multi-select field. Values come from the Sub-functional Expertise master. |
|
|
Salary |
Currency |
Currency used for the salary. |
Optional, single select field. Defaults to the currency configured under System Settings > Internationalisation. Can be changed. |
|
Salary Unit |
Specifies whether salary is Annual, Monthly, Hourly, etc. |
Optional, single select field. Values come from the salary unit master. |
|
|
Salary Band |
Select the salary range. |
Optional, single select field. Values come from the salary band master. |
|
|
Hide Salary |
Hides salary information from candidates. |
Toggle. Enabling it will keep the salary details confidential when publishing the job-on-job boards. |
|
|
Bonus |
Bonus amount or percentage. |
Type in field. Defaults to 0 and should not exceed 10 characters. |
|
|
Equity |
Equity offered as part of the package. |
Type in field. Defaults to 0 and should not exceed 10 characters. |
|
|
Job Description |
Job Description |
Enter the complete job description and responsibilities. |
Optional. |
|
Internal Notes |
Internal comments visible only to recruiters. |
Type in field. Not visible to candidates. |
|
|
Tags |
Keywords used for searching and categorising jobs. |
Optional, multi-select drop-down. Values come from the Tag master. |
|
|
Advanced |
Job Rank |
Specifies the job's level within the organisation. |
Optional. Defaults to 0. Should not exceed the 9999 numeric values. |
|
Head Count |
Number of positions available. |
Optional. Defaults to 1. Should be between 1 and 9999. |
|
|
Filled Date |
Target date by which the role should be filled. |
Optional. |
|
|
Open Date |
Date from which candidates can apply. |
Mandatory. |
|
|
Job Expiry Days |
Duration until the job posting expires or is removed from listings. |
|
|
|
Primary Owner |
User with overall responsibility for the job. |
Mandatory, single select field. Defaults to the logged-in user creating the job. If the current username is removed from the Primary Owner field and another user is selected, the selected user becomes the primary owner. |
|
|
Owners |
Additional users responsible for the job. |
Optional, multi-select field. |
|
|
Company Contacts |
Associates company contacts with the job. |
Optional, multi-select field. |
|
|
Brands |
Associates the job with one or more brands. |
Optional, single select field. |
|
|
Job Workflow |
Defines the recruitment stages for the job. |
Mandatory field. By default, the workflow marked as the default in the Job Workflow Master is automatically selected. You can change as per your needs. |
|
|
Map Application Form |
An application form collects candidate details when they apply for a job if mapped. It’s an optional field (for apply type - native apply) and can be mapped to a job to ensure the right questions and information are captured for that specific role. |
By default, the toggle is Off. To attach an application form, turn the toggle On. When enabled, the application form marked as the default in the Application Form Master is automatically selected. For information on configuring an application form, see Configure Job Application Form. |
|
|
Access |
Controls who can view the job. |
Example: Public, confidential and protected. To read more details on access permissions, click here: General Data – Access Permissions. |
|
|
Status |
Defines the current job status. |
Default: Active. |
|
|
Reason |
Reason for the selected status. |
Used where applicable. |
|
|
|
Publish to Job Boards |
|
If you have chosen the Publish to Job Boards option, after saving, you will be directed to the Job Boards page. From there, select the desired job board (Seek or Broadbean) and click Continue to publish the job. If not, you can publish it later |
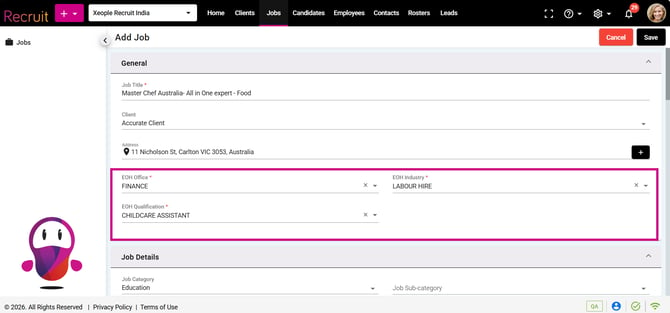
Create Job Form - EOH Driven Fields
Job Status - Reason
You can configure one or more Reasons for each Job Status. Reasons provide additional context for why a job has been moved to a particular status.
For example, for the Inactive status, you can configure reasons such as:
- Position no longer required
- Client withdrew the requirement
When a user updates a job status, they can select an appropriate reason from the configured list.
Behavior:
- If a Reason is selected while updating the job status, an (i) information icon is displayed next to the Job Status in the Job Landing. Hover over the icon to view the selected reason.
- If no reason is selected, the Job Status is displayed without the (i) information icon.
You can configure multiple reasons for each job status. The available reasons are filtered based on the selected job status.
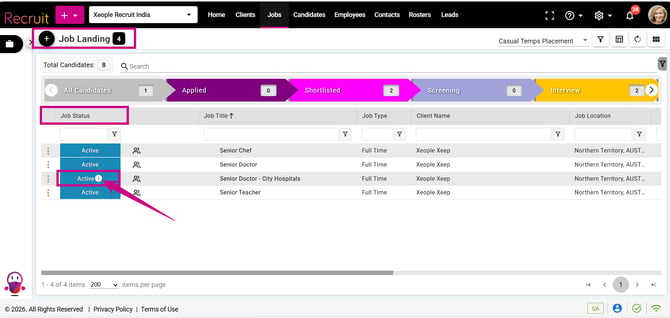
Job Landing Page - Job Status - Reason - i icon
- Fill in all the required fields and click Save.
- To edit, clone, view, share or close a Job, click on the three-dot button and select the required option as needed.
Edit Job Case:
You can edit all job fields except the Job Reference ID. The Job Reference ID is generated when the job is created and cannot be modified.
The Job Workflow is editable only if no applicants or candidates have been assigned to the job. Once a candidate or applicant is assigned, the Job Workflow becomes read-only and cannot be changed.
Any updates made to the editable fields are saved and reflected in the job details.
EOH Driven Fields:
- The EOH Office, EOH Industry, and EOH Qualification fields are used when a candidate is automatically pushed to EOH. If you change any of these fields, the new value will be used for candidates who apply after the change. Candidates who were already pushed to EOH will not be updated. They will continue to have the old value that was used when they were originally pushed.
- Example: If the EOH Industry is changed from Health Care to Health and Checks, new candidates will be pushed to EOH with Health and Checks. Candidates who were already pushed with Health Care will remain as Health Care.
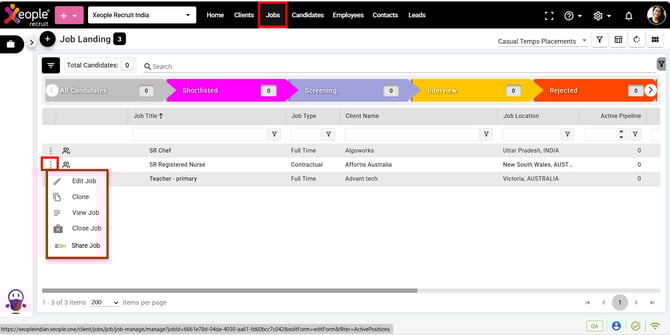
Job Landing Page - Three-dot - Edit, Clone, View, Close Job
Similarly, to add a job from the Quick add Job panel, follow these steps:
- Navigate to the main navigation header bar and click on the Quick add Job (+) on the top left side.
- Select Job and follow the steps outlined above to create a new job.
You have limited options for adding a job. If you wish to include additional options, click on Configure Job Fields located at the top right corner, select the desired fields, and then click Save.
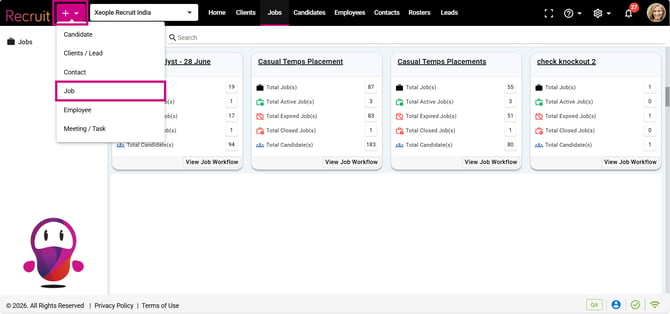
Quick add Job - Add Job
If you click on the active jobs count and see 5 active jobs in the workflow, but no jobs appear on the landing page, it means you have not created any jobs where you are the primary owner. The total count reflects 5 active jobs created by others. To view these jobs, set the filter to Primary Owner and Primary Owner to All. This will display the full list of active jobs.
Similarly, to add a job from the Job Landing page, follow these steps:
- Navigate to the main navigation header bar and click on Jobs.
- Select a Job Workflow and click on (+) Add Job.
- Fill in all details in the form and click Save.
Upon creating a job from the job landing page, if you selected a different job workflow from the Job Workflow drop-down, consider checking the created job under that specific workflow.
If you have created only one Job Workflow, clicking on Jobs will automatically redirect you to the Job Landing page, as there are no workflows to select.
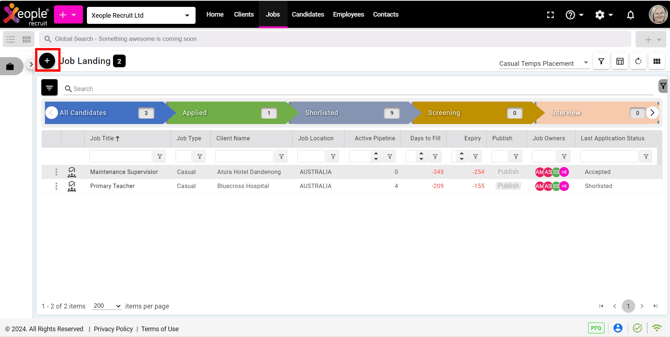
Jobs - Job Landing Page - Add Job
Recommend Reading: How a job is published and how the job expiry to seek expiry works in detail, click here: Posting Job via SEEK.