Candidate Landing page typically consists of a list of candidates created or sourced from various channels such as forms, application forms, Xeople SmartEmail, Entire OnHire Push or Extract, Job Board (Seek or Broadbean). It offers basic details of candidates including Candidate Name, Email ID, Phone Number, Status, Source, and other pertinent information. For example, if a candidate is created via Seek, you can scroll to the right to view the Source column and identify where the candidate originated.
To navigate to the Candidates Landing page, follow these steps:
- Navigate to the main navigation header bar and click on Candidates.
-
You will view the list of all candidates along with their basic details.
Actions to perform on the Candidate Landing page:Candidate - Candidate Landing Page
- Add a Candidate.
- Search: Allows you to swiftly locate specific candidate by entering keywords or search terms, facilitating efficient retrieval of relevant candidate or details.
- Refresh Button: Allows you to refresh the page and update the candidate listings in real-time.
- Proximity: The proximity search feature allows you to find candidate(s) by entering an address and setting a specific kilometer (KM) range around that address as a permanent filter.
- Grid View: Presents candidate details in a card-style format, offering you a quick and intuitive way to scan through essential information.
The default view is List View, where you can see candidate details presented in a list format.
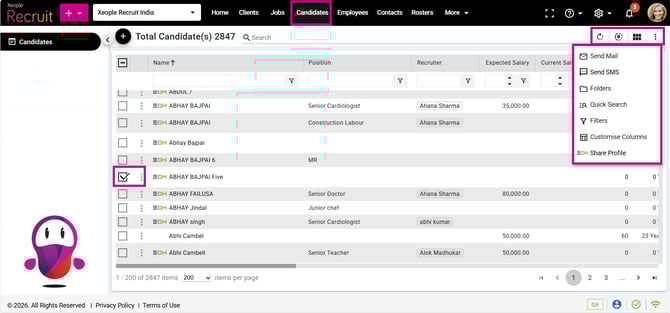
Under the three-dot button:
- Send Mail & SMS: Click on the checkbox placed in front of the candidate’s name to send mail or SMS directly to candidate(s). It works for single/multiple selections.
- In case of Email:
- When you click Send Mail, a new email screen opens on the right-hand side, automatically populating the candidate(s) email ID(s) in the To field.
- If you add or remove any, email ID, the system sends emails only to the recipients currently visible in the To field.
- If you add a new internal candidate, placeholders (if used) will populate correctly. If you add an external email, they will receive exactly what is written in the editor.
- CC and BCC recipients receive one separate email for each person in the To field, and BCC names are hidden from everyone.
- For example: If John and Elsa are in the “To” field, Michael and Sophia in CC, and David and Emma in BCC, then John and Elsa each receive one email, while Michael, Sophia, David, and Emma each receive two separate emails and BCC recipients remain hidden from everyone.
- You can insert a template from the Insert Template button, which displays your created or shared templates.
- When multiple candidates are selected, the placeholder will not be replaced with an actual value, as the system cannot determine which candidate's information should be used in that context.
- If one candidate is selected, the placeholder will be replaced with the actual value.
- If in case, a different email ID associated with a candidate was added manually. In this case, the Email Preview will not replace the actual value of the placeholder because the system did not trigger an update; however, the received email displayed the correct candidate's name.
- When you click Send Mail, a new email screen opens on the right-hand side, automatically populating the candidate(s) email ID(s) in the To field.
- In case of Email:
-
- In case of SMS:
-
-
- Click the Insert Template button to choose an existing template instead of composing a new message.
- You can see the selected candidate(s) main phone number(s) in the To field in read mode. The main number added against the candidate is picked by default. To add a candidate number, go to Candidate Summary>Summary>General Information>Phone Number.
- Type in your message and click Send.
-
- Folders: Organise candidates by adding them to folders.
- Quick Search feature allows you to search candidates based on their status and current position.
- Filters: You can use advanced filters to quickly sort and refine the displayed candidate listings based on various criteria such as current company, salary, experience, skills, source, status, etc. For e.g., if you apply the Skills filter you can see candidates only related to that skill(s).
Added EOH ID, Synced By, Synced On to filter candidate(s) based on the shared and synced information with EOH.
- Customise Columns: Help you to customise columns appearing above all the listed candidates to reflect the field type.
Added EOH ID, Synced By, and Synced On in the action column, allowing you to customise displayed columns based on shared and synced data with EOH.
- Share Personnel: Click on the checkbox placed in front of the candidate’s name to share candidate from XeopleRecruit to Entire OnHire as an applicant/member with ease.
Recommend Reading: To read more on how to push a candidate as an applicant or member, click here: Push Candidate as an Applicant & Push Candidate as a Member.
- Column Filters: You can use the column filters to refine the data displayed in a particular column based on specific criteria or conditions.
Under the three-dot button placed in front of candidate name:
- View Summary: Will let you navigate to the candidate summary page where you can find details of candidate.
- Share Personnel: Share candidate from XeopleRecruit to Entire OnHire as an applicant/member with ease.
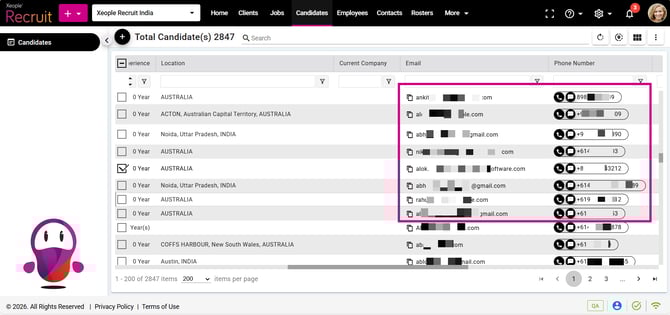
Actions to perform while scrolling right:
- Candidate Email: Send email to candidate from here itself.
- Phone Number or SMS: Make calls if a calling app is integrated and installed in your system or send SMS to candidate if the phone number is available.
- You will see the SMS Credit Balance on the top.
SMS credit are payment units that determine how many text messages you can send, each SMS (up to 160 characters) or multipart message consumes one or more credits. In XeopleRecruit, you can manage SMS credits in two ways: you can purchase them directly through your client account, or the XR team can buy credits from Kudosity (SMS) and allocate them to you.
-
- When you click type your message here, the Phone Type dropdown displays all available numbers (if added). It defaults to the main number if no SMS has been sent, otherwise, the last number used for SMS is shown. Simply pick a different number if needed, SMS will go to whichever number you select. Add one or multiple candidate numbers under Summary>General Information>Phone Number.
- Click the Insert Template button to choose an existing template instead of composing a new message and click Send.
Candidate Landing - Email/Call/SMS