Content
📈Enhancements
- Client Summary – Activate the SMS tab
- Job Summary Page – List View – Three-dot – Resume – Add Parse Resume & Keyword Search
- Client & Job Summary Page – Notes – Search by Contact
- User Management - Team
- Administrator - Masters - Job Workflow
- Administrator – Add Organisation Details - Organisation Name
- Xeople Search – Job - Send SMS
- Job Landing & Job Summary – Close Job Icon
- Jobs – Create Job – Complete a Form
- Job Summary Page – Three-dot - Actions - New Candidate Card
- Job Action Screen
- Application Form
- Master – Job- Application Form - Welcome & Thank You page
- Client Landing Page – List/Graph View – Three-dot – Send Mail – Add Client and All option
- Client Landing Page – List/Graph View – Three-dot – Send SMS – Add Client and All option
- Employees – Employee Summary Page – Mail – Disabled
- Changes in Client & Contact Summary
1. Client Summary – Activate the SMS tab
We've enabled the SMS tab within the Client Summary page.
Key Changes:
- You access the Client SMS history.
- All sent and received SMS messages are now displayed in the SMS tab.
- Additionally, we've introduced a provision for composing new SMS messages, along with a refresh button for updating the SMS history.

2. Job Summary Page – List View – Three-dot – Resume – Add Parse Resume & Keyword Search
we've introduced a Parse Resume and Keyword search feature on the Resume screen.
Key Changes:
- Added Parse Resume button in the Resume and the Parse Resume tab to allow users to parse resumes directly from these screens.
- Enabled the Parse Resume tab to display parsed resume data, with an option to perform keyword searches within the parsed data. If there is no data available, it will shows no data on the screen.
- Ensured consistent functionality across the application, including paths such as:
- Tenant → Home → Jobs → Job Summary → Applicants → Grid view → Resume
- Tenant → Home → Xeople Search → Xeople Pool → Total Matches → Grid View → View Resume
- Tenant → Home → Jobs → Job Summary → Click on workflow stage count → Applicants list → View Resume
- Tenant → Home → Jobs → Job Landing → Click on workflow stage count → Applicants list → View Resume


3. Client & Job Summary Page – Notes – Search by Contact
We've added a new filter button next to the Refresh button on the Job and Client Summary page under Notes. This icon has a tooltip labelled Search by contact. If no contacts have been mapped to the selected client, the filter will be disabled for both job and client.
Key Changes:
- Clicking on Search by Contacts will open up a pop-up screen where you can enter the name of the contact or the email ID.
- You can select single or multiple contacts and click on the Apply button to view their relevant notes on the screen.


4. User Management - Team
we've updated the existing menu named User Groups to Team.
Key Changes:
- Upon clicking, it now opens a page with the following fields:
- Team Name: This displays the team’s name. Sorting is defaulted to this field. Mandatory free-text field limited to 50 characters.
- Owners: A new field added to displaying the owners of the team. It accommodates single or multiple owners. It's a mandatory multiple dropdown field showing a list of employees (invited to application), allowing you to select one or multiple owners. Owners are not included as team members and are disabled in the list.
- Team Members: Another new field added to the grid showing the members of the team. Like owners, it accommodates single or multiple members. A mandatory multiple dropdown field displaying internal employee (invited to application) options for adding team members.
- Description: A mandatory free-text field with a maximum character limit of 250. An expand icon is available to enlarge the text field as needed.
- Status: Displays whether the team is active or inactive.
- Created By: Shows the name of the creator of the team.
- Last Updated On: Indicates the date and time of the last update.
- Three-dot icons options:
- View User Groups renamed to View Team for clarity.
- Edit: Allows users to modify team details.
- Delete: Permits users to remove the team with a standard confirmation message.
- To access the new card view, click on the grid view for improved visibility.


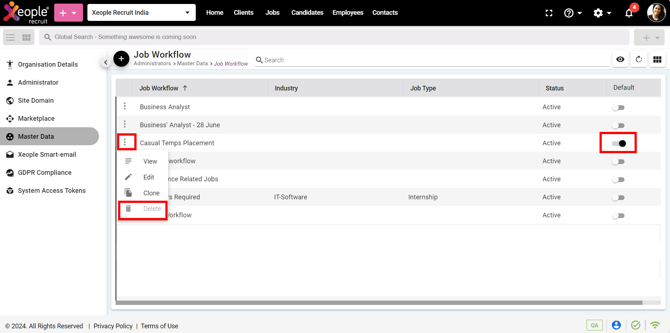
5. Administrator - Masters - Job Workflow
We've implemented the functionality for setting a default workflow. You can now designate any workflow as the default in the Job Workflow master.
Key changes:
- When creating a job from various menus or templates, the default workflow is automatically selected.
- You can set only one workflow as default via a toggle button, with one workflow already set as default by default from the admin end.
- Additionally, you cannot delete the default workflow, as the delete option is disabled for this case.
- Furthermore, we've introduced the ability to make workflows inactive. This hides the entire workflow and its associated jobs from the job page. When users navigate to the Jobs section, inactive job workflows are not displayed.
- To mark a workflow as inactive, you can select the inactive status while configuring workflows under the master. Inactive workflows are not available for selection in other areas of the application.
- When you inactivate a job workflow, its associated jobs will still be displayed in other areas such as the job drop-down menu in mail, Xeople Search and meeting activities.
6. Administrator – Add Organisation Details - Organisation Name
We have enhanced the Organisation Name field to allow a maximum of 50 characters.

7. Xeople Search - Revert Proximity Functionality
We have reversed the previous functionality where proximity was automatically applied when a user selects a job without specifying the proximity parameter.
Key change:
- When you select jobs without specifying the proximity parameter, the proximity field will now display the proximity values in the search results.

8. Xeople Search – Job - Send SMS
We've improved the SMS functionality within Xeople Search. Now, when you select a job and search for candidates in Xeople Search, they can efficiently use the job tags within the SMS tab.
Key changes:
- You can efficiently select, and message candidates based on applied filters, ensuring that job-specific tags in SMS templates fetch accurate values.
- Bulk actions seamlessly replace tag values for each selected candidate, improving communication precision and effectiveness.

9. Job Landing & Job Summary – Close Job Icon
We've updated the Close Job icon, as it was previously indicating job deletion, which is not a feature of the application. The icon has been changed to accurately reflect its function.


10. Jobs – Create Job – Complete a Form
We've enhanced the create job (Head Count) functionality to ensure a seamless process for users.
Key changes:
- Head Count field: It now defaults to 1, applicable at the Application level as well.
- The headcount defined while creating a job should match the number of candidates placed in the Hired stage (last stage).
- If a user attempts to move a candidate beyond the head count, a system alert message is displayed, the job was created with a headcount of (2). You can only move (2) candidate(s) to this stage.
- The default workflow defined in the master data is now auto selected in the Job Workflow field, with the option for users to change it.
- Additionally, when a user clones a job, the job workflow is also cloned, and the headcount is reset to 1.
- These implementations apply to various paths within the application, including:
- Jobs >Create Job>Use a Template
- Quick Add Job>Job>Complete a Form
- Quick Add Job>Job>Use a Template
- Administrator>Master>Job>Job Template master
- Clients>Summary Page>Job Tab>Complete a Form
- Tenant>Clients>Summary Page>Job Tab>Use a Template

11. Job Summary Page – Three-dot - Actions - New Candidate Card
We've replaced the old candidate card with a new one and added a Profile Status field into the card.
Key change:
- Added the Profile Status field to the Candidate personal card for improved clarity and functionality.

12. Job Action Screen
We've enhanced the Job Action screens by reordering the tabs sequence and activating the timeline feature. Clicking on the timeline now displays all jobs, including expired and closed ones, for the candidate. Additionally, we've added hyperlinks to candidate profiles, allowing direct access to the candidate summary page. Additionally, other improvements have been implemented to enhance user experience and efficiency.
Key changes:
- The sequence of tabs in Job Actions has been updated to improve user experience.
- The Timeline feature has been added. Clicking on it now opens all jobs for the specific candidate, including expired and closed ones. Current jobs are displayed on top, highlighted, along with the total count of jobs on the screen. Additionally, each job now shows its Job ref ID. This change is updated in the other areas to like the Job Summary
- Hyperlinks have been added to view the Candidate Summary
- Clicking on the profile picture or mouse hover will display the label View Candidate Profile.
- When clicking on the candidate's name it opens a contact card, a hyperlink is placed to open the candidate profile in a new tab and hovering will show the label View Candidate Profile.
- Hyperlinks for Client & Job Summary: Client and job names are now hyperlinks that directs to the Client and Job Summary pages, respectively. Mouse over displays labels View Client Summary and View Job Summary.
- Close Job Action:
- The action pop-up closes smoothly when all data is saved.
- In cases where unsaved data is present, you now have clear options when clicking the close icon. You can choose to Exit without Saving or Save & Exit, along with the cancel option.


13. Application Form
We've updated the application form labels and validations for consistency and accuracy.
Key changes:
- Apply through Application form.
- Application labels and validations have been replaced with the updated ones.
- For creating a candidate without a job:
- In the case of an existing candidate, a prompt will appear: Oops! Looks like this candidate already exists in the system! Do you still want to continue editing the existing candidate profile?
- Tenant → Candidate → Add candidate → Select Application form.

14. Master – Job- Application Form - Welcome & Thank You page
We've updated both the welcome and thank you pages in the application form.
Key changes:
- We have removed the individual Preview, Cross, and Save buttons from the Welcome and Thank You
- Instead of the Cancel button, we have replaced it with Exit.
- Clicking Exit will close the popup. Furthermore, clicking Save will save specific or all data without closing the popup.

15. Client Landing Page – List/Graph View – Three-dot – Send Mail – Add Client and All option
We've enhanced the Send Mail feature to allow users to send emails to All, Clients, Primary Contacts, and Contacts directly.
Key changes:
- Renamed the Send Mail to Contacts label to Send Mail for consistency.
- Added a new option, Clients, and All, alongside the existing options. Users can now select either All, Clients, Primary Contacts, or Contacts.
- Modified the sequence of options to All, Clients, Contacts, and Primary Contacts.
- Replaced the All Contacts label with Contacts to avoid repetition of the word All.
- If the user selects Clients, the email should include only the email IDs of the clients. For the All option, the email should include all email IDs, including those of clients, primary contacts, and other contacts.
- Ensured that the default selection matches the previous implementation for Primary Contacts.
- Enabled the Send Mail option regardless of whether the email is integrated or sent from system notifications.
- Synchronised events in the Activity.
- Restricted users from manually entering other email IDs.
- All the transaction will be saved under the Mail section.

16. Client Landing Page – List/Graph View – Three-dot – Send SMS – Add Client and All option
We've implemented the ability for users to send SMS messages to All, Clients, Primary Contacts, and Contacts.
Key changes:
- We've updated the label from Send SMS to Contacts to Send SMS for consistency.
- Additionally, we've introduced a new option called Clients and All.
- Users can select Client option to include main phone numbers for clients. The All option encompasses main phone numbers for clients, primary contacts, and other contacts.
- The sequence for options has been adjusted to be All, Clients, Contacts, and Primary Contacts.
- We've replaced All Contacts with Contacts to avoid repetition of the word All.
- Events are now synced in the Activity section, ensuring consistency with sending and receiving SMS.
- Users are restricted from manually entering other phone numbers.
- All the transaction will be saved under the SMS section.

17. Employees – Employee Summary Page – Mail – Disabled
We've disabled the Mail tab under the Employee Summary page to address email privacy concerns.

18. Changes in Client & Contact Summary
We have enhanced the Client & Contact Summary page.
Key Changes:
- On the Client Summary, Contacts section:
- You can now easily navigate to associated contacts by clicking on their first name, which appears as a highlighted hyperlink.
- Clicking on the hyperlink opens the specific contact summary page in a new tab.
- On the Client Summary, Jobs section:
-
- The job names now appear in highlighted mode, indicating they are clickable hyperlinks.
- You can click on the job name to open the job summary page in a new tab, ensuring a smoother navigation experience.
- On the Contacts Summary Page, Client section:
-
- Client names are now hyperlinks displayed in highlighted mode.
- Clicking on a client name opens the client summary page in a new tab, facilitating quick access.
- On the Candidate Summary Page, Jobs section:
-
- The job titles are now hyperlinks displayed in highlighted mode for better visibility.
- You can click on the job title to open the job summary page in a new tab, improving the user experience.

Related Article: