A predefined template where you manually input candidate details. This template offers a structured format for entering diverse details about a candidate.
Share Candidate with Entire OnHire (EOH)
You can share a candidate from XR to EOH as either an Applicant or a Member, depending on the purpose:
- Applicants are added to make them available for suitable shift (job) mapping.
- Members are used for shift allocation and payroll processing.
Sharing candidates helps:
- Maintain a synchronised candidate repository across XR and EOH.
- Ensure data consistency between platforms.
- Avoid duplicate data entry if the candidate already exists in EOH, making job sharing from XR more efficient.
To create/add a candidate via Form, follow these steps:
Optional Reading: To discover the two ways to access the option for creating a candidate, click here: Create Candidate - Meaning & Purpose. This article helps in guiding you to reach to the Complete a Form page.
Recommend reading: How to configure EOH from the marketplace, click here: Marketplace Configuration - Entire OnHire (EOH). Subscribe to the feature Share Personnel to EOH under the EOH tab in the Marketplace.
- Select Complete a Form from the given options.

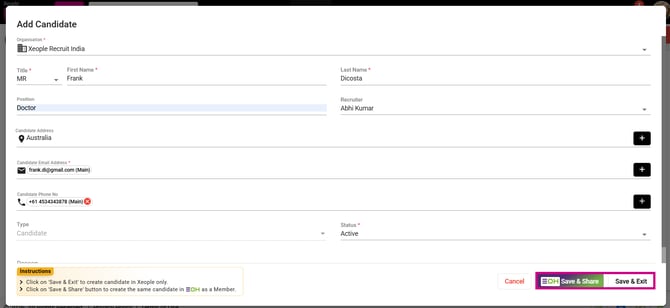
Create Candidate - Form
- Fill in the remaining details and click Save & Share.
If EOH is not integrated, then this button will not display.
Fields while adding a candidate via form
|
Field |
Description |
|
Organisation |
Represents the associated company/entity. This field is auto-selected based on your last logged-in organisation. If you have access to multiple organisations, it will appear in a dropdown, allowing you to select the organisation in which to create the candidate. |
|
Title* |
Select the candidate’s title (mandatory). This field uses XR system-defined values: Mr, Mrs, Miss, Ms, Dr, Prof and has no EOH dependency. |
|
First Name* |
Enter the candidate’s first name (mandatory). |
|
Last Name* |
Enter the candidate’s last name (mandatory). |
|
Position |
Enter the candidate’s current position. |
|
Recruiter |
Select a recruiter from the dropdown (single select). Values coming from the employee module. |
|
Candidate Address |
Enter the candidate’s address details. |
|
Candidate Email Address* |
Enter the candidate’s email ID (mandatory). Must be unique; used to avoid duplicates. |
|
Candidate Phone No |
Enter the candidate’s phone number. Country code defaults to +61 (Australia). As set under the System Settings → Internationalisation . |
|
Type |
Indicates the record type (default: Candidate). |
|
Status* |
Select the candidate status (e.g., Active) (mandatory). Values coming from the candidate status master. |
|
Reason |
Enter a status reason for the candidate (e.g., reason for rejection). Values from the reason master. |
Recommend reading: How to share a candidate as an applicant or member: Push Candidate as an Applicant & Push Candidate as a Member.
Add Candidate - Enter Details
-
- The Share & Exit will let you save the candidate only in XR.
- You can see the candidate created on the Candidate Landing page.
- Click on the Candidate or the three-dot button, then select View Summary to view or add more details for this particular candidate.
- All extracted details will be saved under Candidate Summary > Summary.
- Once a resume is uploaded, it will be automatically parsed, and the extracted details can be viewed under Candidate Summary > Resume > Parsed Resume.
-
You can add more details from the Candidate Summary page, where you can edit general information, add skills, additional information, address details, etc. Check out these articles for more details, click here: Profile Details, Education Details, Employment History.
Recommend reading: To view how the applicant and member details appear in Entire OnHire, click here: Applicant Profile, Member Profile.