
The Meeting / Task tab on the Client Summary page lets you schedule, track, and manage meetings and tasks linked to a client, keeping all scheduled activity and follow-ups in one organised place.
Managing meetings and tasks against a client offers several benefits:
- Schedule client meetings, interviews, and follow-ups directly against the client record.
- Keep a clear, time-ordered history of every meeting and task for that client.
- Assign an organiser and set a duration so everyone knows who is responsible and when.
- Generate an online meeting link where the meeting integration is enabled.
- Mark items complete so outstanding follow-ups are easy to see at a glance.
To add a meeting or task from the Client Summary page, follow these steps:
- Navigate to the main navigation header bar and click on Clients.
- You will find a list of all clients. By clicking on a client, you will be redirected to the Client Summary page. Then, navigate to the Meeting / Task tab.
- Click the add button in the top-right action bar to create a new Meeting /Task.
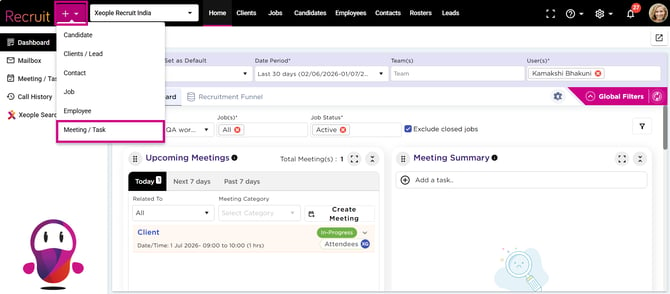
Quick Add - Meeting/Task
Or from the meetings tab
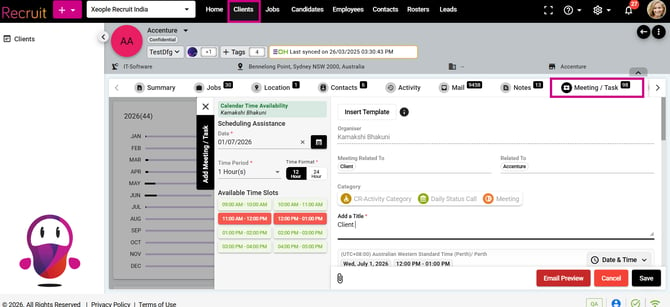
Client Summary Page – Meeting / Task task
- Enter the details in the respective fields and click Save.
-
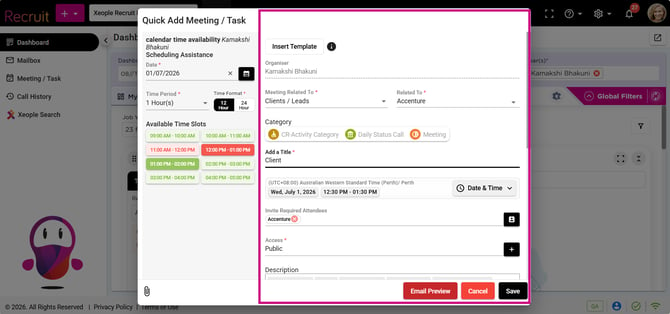
Scheduling Assistance (left panel) – helps you find a free time before you book:
- Calendar Time Availability – Shows the organiser's existing calendar availability so you can avoid clashes.
- Date* – The date you want to schedule the meeting or task. (Required.)
- Time Period* – The length of the meeting, for example 1 Hour(s). (Required.)
- Time Format* – Display the time slots in 12 Hour or 24 Hour format. (Required.)
- Available Time Slots – Suggested slots for the chosen date and period. Green slots are available and red slots are unavailable or already booked. Select a slot to set the meeting time.
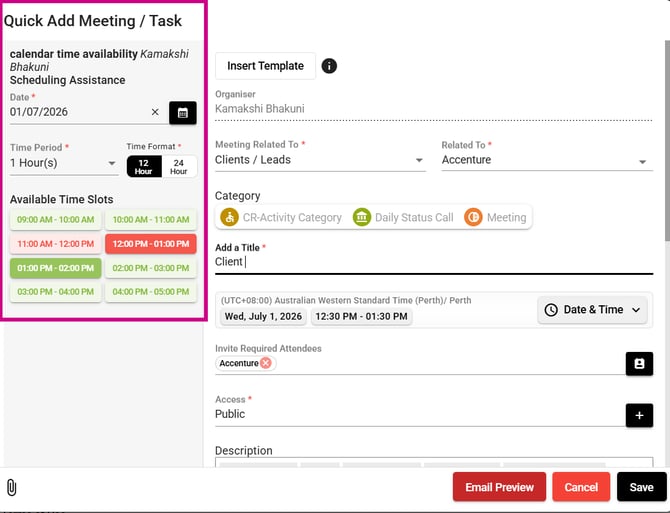
Meeting details:
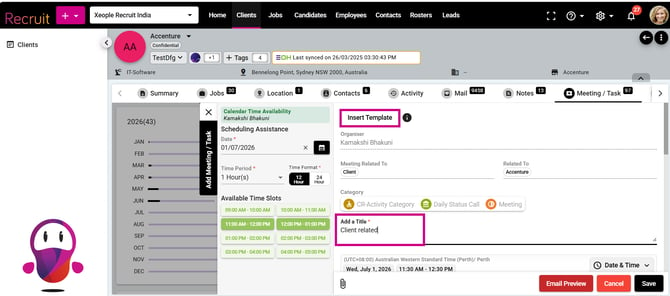
- Insert Template – Insert a pre-saved template to quickly populate the details (click the info icon for guidance).
- Email Template Placeholder Replacement Based on Context
- Scenario 1: Client Email Template Used in Client Summary
Given
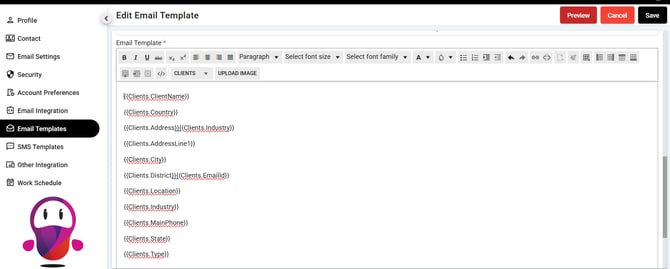
- A client email template is created from Profile Picture → My Profile → Email Templates.
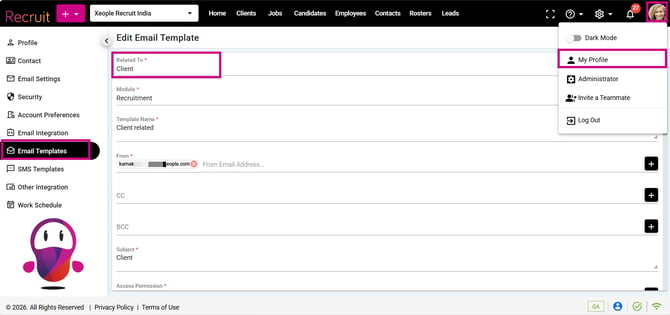
- The template contains Client placeholders such as:
-
{Clients.ClientName}
- Scenario 1: Client Email Template Used in Client Summary
-
-
-
-
-
{Clients.Country}
-
When
- A user creates a meeting/task from the Client Summary.
- The user selects the Client email template.
-
Then
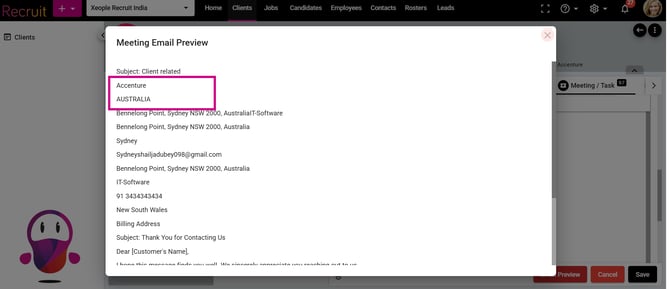
- All Client placeholders are replaced with the actual client values in the mail preview and in the email sent to the recipient.
- Example:
-
-
-
| Placeholder | Replaced With |
|---|---|
|
{Clients.ClientName} |
Accenture |
|
{Clients.Country} |
AUSTRALIA |
-
-
-
-
Scenario 2: For example: Job Template Used in Client Summary
-
-
-
-
-
-
-
-
Given
- A Job email template contains placeholders such as:
-
{Jobs.CandidateName}
- {Jobs.ClientName}
-
-
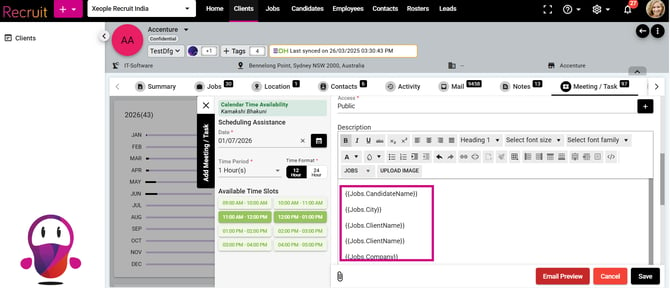
-
-
-
-
-
-
-
When
- A user creates a meeting/task from Client Summary.
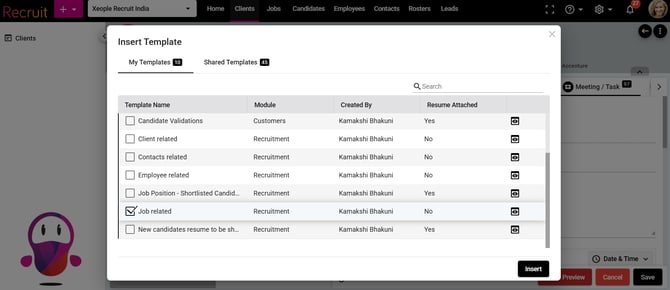
- The user selects a Job template.
-
Then
- The Job placeholders are not replaced in the mail preview and in the email sent to the recipient.
- This is because Client Summary does not have Job context.
- The system cannot find Job information or context.
-
-
-
-
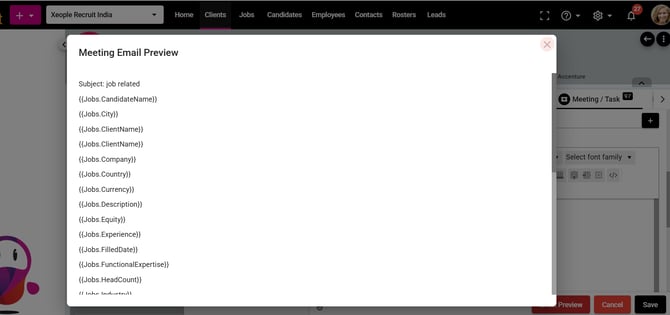
-
-
-
-
Scenario 3: Job Placeholders Inserted in an Client Template
-
Given
- A Client template is being edited.
- The user manually inserts Job placeholders like:
-
{Jobs.CandidateName}
- {Jobs.ClientName}
-
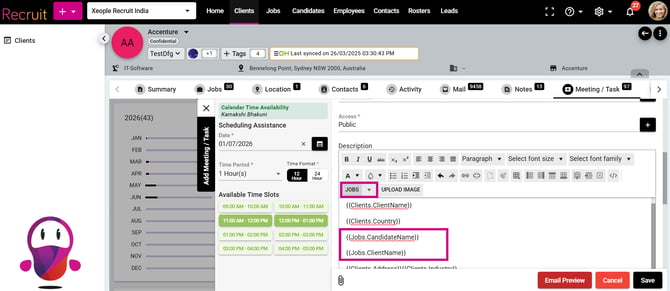
-
-
-
-
-
-
When
- The email is sent from Client Summary.
-
Then
- Client placeholders are replaced correctly.
- Job placeholders are not replaced because Job context is unavailable.
-
-
-
Example
| Placeholder | Result |
|---|---|
| {Clients.ClientName} | Replaced |
| {Clients.Country} | Replaced |
| {Jobs.CandidateName} | Not Replaced |
| {Jobs.ClientName} | Not Replaced |
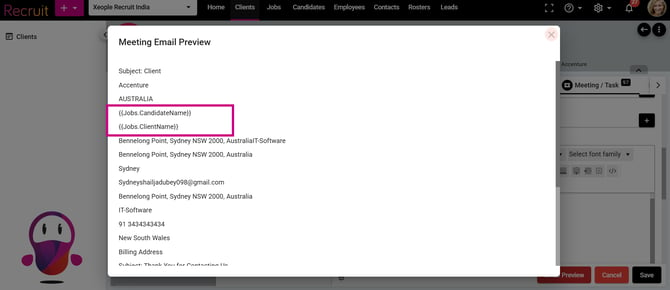
Rule:
Placeholders are replaced only when the corresponding module context is available.
- Client Summary → Replaces only Client placeholders.
- If a placeholder belongs to another module, its value is not replaced because the required context is not available.
-
-
- Organiser – The user creating the meeting or task. This is set automatically.
- Meeting Related To – The type of record the meeting is linked to (for example, Client, Candidate, Contact, Job, or Lead).
By default, the client in the Related To field is selected. The placeholders in the email preview are populated with the details of that client (client in the Related To), regardless of any additional client added as attendees.
-
-
-
- Related To – The specific record the meeting is linked to (for example, the client's name).
- Category – Classify the activity. Options include Call, Daily Call Status, Email, External Meeting with Client, Interview, Meeting, Meeting with Stakeholder, Onsite Interview, Others, Promotional Events, and Share Documents.
- Add a Title* – A clear subject for the meeting or task, for example Interview – Springfield General Hospital. (Required.)
- Date & Time – Confirms the time zone, date, and start–end time. This populates from the slot you selected and can be adjusted using the Date & Time drop-down.
- Invite Required Attendees – Add the people who must attend, using the contact picker. A single email is sent to all the clients (if any others added manually) along with the meeting calendar invitation. This depends on if you ticked the checkbox: Send email to attendees and Send calendar invite to attendees.
- Access* – Sets the visibility of the meeting, for example Public. Use the (+) button to manage access. (Required.)
- Description – A rich-text editor for the agenda or notes, with formatting options and the ability to attach files using the paperclip icon.
- Optional Attendees: Add attendees whose participation is optional. They will appear in the CC field of the same email.
- Meeting Platform: If you have integrated teams from My Profile>Other Integrations it will appear in the drop-down.
- Online Meeting URL: Once a meeting platform is selected (for example: Teams) a virtual meeting link is auto created. The calendar invite will go with the same meeting link.
- Room or Location: Search and select a meeting room or physical location.
- Send Email to Attendees: Sends an email notification to attendees when checked.
- Send Calendar Appointment Invite: Sends a calendar invitation to attendees when checked.
- Email Preview: Allows users to preview the email before sending.
- Attachment: Upload and attach files to the meeting/task.
- Save: Saves the meeting/task record.
- Cancel: Closes the popup without saving changes.
-
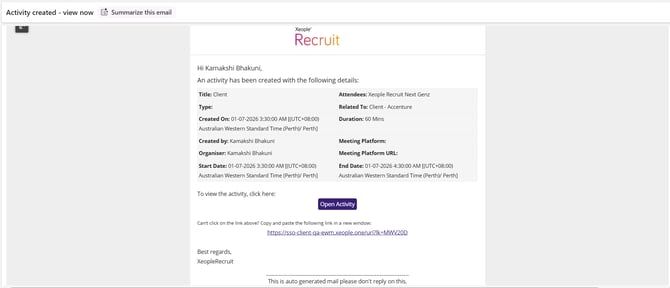
Once a meeting or task is saved (with Send email to attendees ticked), XeopleRecruit automatically sends an "Activity created – view now" notification email from notifications@xeople.com to the relevant people. It confirms the activity and includes an Open button (and a direct link) that takes the recipient straight to the activity in the system.
The email lists the activity details:
- Subject – the email subject ("Activity created – view now")
- Title – the meeting/task title
- Type – the category selected (e.g. Interview)
- Created On (Scheduled on) – date, time and time zone
- Created by – the user who created it
- Organiser – the assigned organiser
- Start Date - the date and time when the meeting will commence.
- Attendees – the invited attendees
- Related To – the linked record type and name (e.g. Client – [name])
- Duration – the meeting length (e.g. 60 Mins)
- Meeting Platform – the online platform, if one is set
- Meeting Platform URL – the online meeting link, if generated
- End Date – the date and time when the meeting will conclude.
- Open – a link/button to view the activity directly
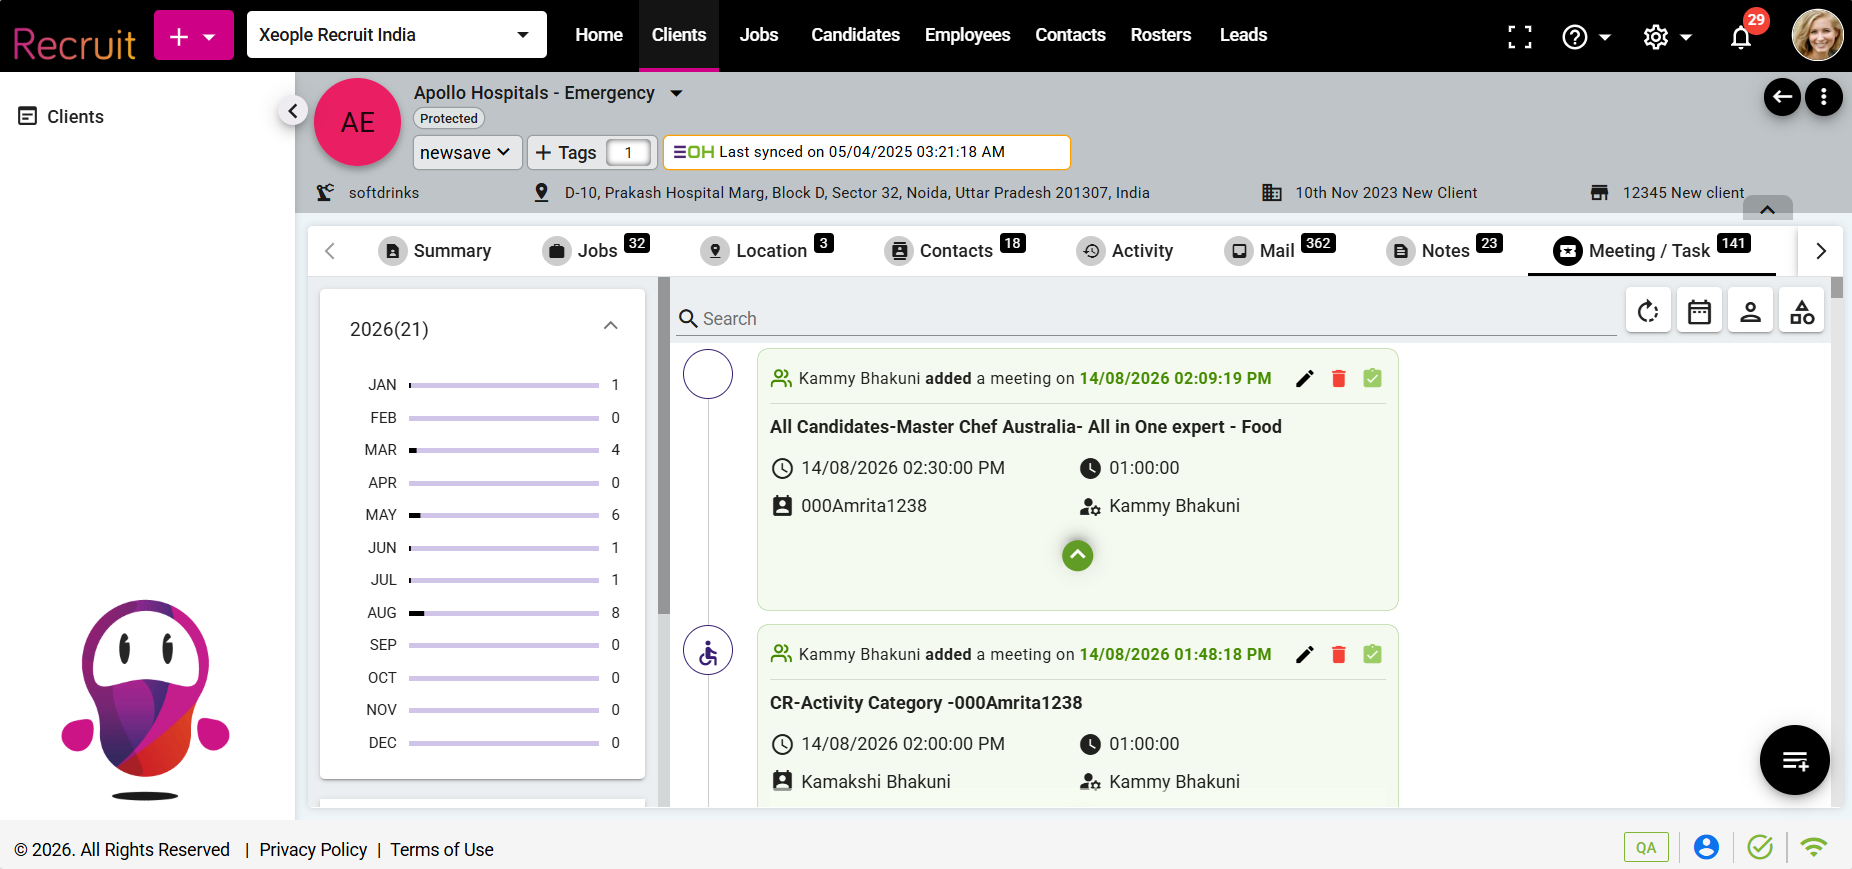
Each meeting or task entry displays the following details:
- Subject – The title of the meeting or task (for example, Interview – Springfield General Hospital).
- Date & Time – The scheduled date and time of the meeting or task.
- Organiser – The employee who created the meeting or task.
- Related To – The client, the meeting or task is linked to.
- Duration – The length of the meeting (for example, 01:00:00).
Where an online meeting integration is enabled, an online meeting control bar appears on the entry, allowing you to start or join the meeting, copy the meeting link, and download or share the details.
Meeting Created - Details
- At the top of the meeting record, the system displays the Created Date/Time alongside the meeting creator details (i.e., who created the meeting), as these details are related to the record's creation.
- Within the meeting tile/summary section, the Scheduled (Booked) Date and Time are displayed as a dedicated field, as this is the primary information when viewing a meeting. Place Booked Time and Duration side by side for better clarity.
- Attendees and then the Organiser details.
Add Meeting / Task – Save
- To edit or delete an entry, click the pencil (edit) or bin (delete) icon shown on each entry.
- To mark a meeting or task as done, click the green tick (complete) icon on the entry.
Use the Search bar at the top to quickly find a specific meeting or task. On the left-hand side, entries are organised by year and month. If entries do not appear, select the desired month from the left panel to display the meetings and tasks created during that period.

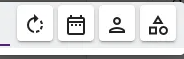
Those four icons are the action/filter bar for the Meeting / Task tab — same logic as the filters on the Notes tab. Left to right:
- Refresh (circular arrow) — reloads the meeting & task list.
- Date (calendar) — filter entries by date.
- Owner (person) — filter by the person who created/owns the entry.
- Category (shapes) — filter by category.
Optional Reading: To set up online meetings, see the Marketplace Configuration – Microsoft Teams Meeting article. Meetings and tasks added against a client are also logged in the Activity tab.